以上是颜色代码
本程序控制的是8266的 io 0 默认上电LOW
有需求可以知己改写
siri+小爱+小度+天猫 控制灯 带反馈功能

话不多说直接上代码
#define BLINKER_WIFI //官方wifi协议库
#define BLINKER_MIOT_LIGHT // 设置小爱灯类库
#define BLINKER_DUEROS_LIGHT // 设置小度灯类库
#define BLINKER_ALIGENIE_LIGHT // 设置天猫灯类库
#define BLINKER_PRINT Serial //串口协议库
#include <Blinker.h> //官方库
#include <ESP8266WiFi.h> //官方库
WiFiServer server(80); // 服务器端口号
char auth[] = "*********"; //设备key
char ssid[] = "*********"; //路由器wifi ssid
char pswd[] = "*********"; //路由器wifi 密码
bool oState = false;
int kg=0;//继电器输出
//*******新建组件对象
BlinkerButton Button1("btn-abc"); //设置app按键的键名
BlinkerButton Button2("btn-off");
BlinkerButton Button3("btn-on");
//*******app上按下按键即会执行该函数app里按键
void button1_callback(const String & state) //点灯app内控制按键触发
{
}
void button2_callback(const String & state) //用state来存储组键的值按键
{
BLINKER_LOG("app操作了!: ", state); //串口打印
if (digitalRead(kg)==LOW) { //如果state是on状态
BLINKER_LOG("灯关了!"); //串口打印
digitalWrite(kg, HIGH);
Button1.color("#FF0000"); //设置app按键是红色
Button1.text("灯关了");
Button1.print("off"); //反馈回按键状态是开
}
}
void button3_callback(const String & state)
{
BLINKER_LOG("app操作了!: ", state); //串口打印
if (digitalRead(kg)==HIGH) { //如果state是off状态
BLINKER_LOG("灯亮了!"); //串口打印
digitalWrite(kg,LOW);
Button1.color("#00BB00"); //设置app按键是绿色
Button1.text("灯亮了");
Button1.print("on"); //反馈回按键状态是关
}
}
//+++++++++++++++++++++++++++++++++++++++++++++++++++++++++++++
//*******如果小度 有对设备进行操作就执行下面
void duerPowerState(const String & state)
{
BLINKER_LOG("小度语音操作!"); //串口打印
if (state == BLINKER_CMD_ON) {
digitalWrite(kg,LOW);
BlinkerDuerOS.powerState("on");
BLINKER_LOG("灯亮了!");
BlinkerDuerOS.print();
oState = true;
}
else if (state == BLINKER_CMD_OFF) {
digitalWrite(kg,HIGH);
BlinkerDuerOS.powerState("off");
BLINKER_LOG("灯关了!");
BlinkerDuerOS.print();
oState = true;
}
}
//+++++++++++++++++++++++++++++++++++++++++++++++++++++++++++++
//*******如果小爱有对设备进行操作就执行下面
void miotPowerState(const String & state)
{
BLINKER_LOG("小爱语音操作!"); //串口打印
if (state == BLINKER_CMD_ON){
digitalWrite(kg,LOW);
BlinkerMIOT.powerState("on");
BLINKER_LOG("灯亮了!");
BlinkerMIOT.print();
}
else if (state == BLINKER_CMD_OFF){
digitalWrite(kg,HIGH);
BlinkerMIOT.powerState("off");
BLINKER_LOG("灯关了!");
BlinkerMIOT.print();
}
}
//+++++++++++++++++++++++++++++++++++++++++++++++++++++++++++++
//*******如果天猫精灵有对设备进行操作就执行下面
void aligeniePowerState(const String & state)
{
BLINKER_LOG("need set power state: ", state);
if (state == BLINKER_CMD_ON) {
digitalWrite(kg,LOW);
BlinkerAliGenie.powerState("on");
BlinkerAliGenie.print();
}
else if (state == BLINKER_CMD_OFF) {
digitalWrite(kg,HIGH);
BlinkerAliGenie.powerState("off");
BlinkerAliGenie.print();
}
}
//*******app定时向设备发送心跳包, 设备收到心跳包后会返回设备当前状态30s~60s一次
void heartbeat()
{
BLINKER_LOG("状态同步!");
if (digitalRead(kg)==LOW)
{
Button1.print("on");
Button1.color("#00BB00"); //设置app按键是绿色
Button1.text("灯亮了");
}
else
{
Button1.print("off");
Button1.color("#FF0000"); //设置app按键是红色
Button1.text("灯关了");
}
}
//++++++++++++++++++++++++++++++++++++++++++++++++++++++++++++
void setup()
{
// 初始化串口
Serial.begin(115200);
delay(10);
BLINKER_DEBUG.stream(Serial);
// 初始化有LED的IO
pinMode(kg, OUTPUT); // 定义接通继电器引脚
// pinMode(0, OUTPUT); // 定义接通继电器引脚
digitalWrite(kg, LOW); //默认上电是开 LOW 时的是接通继电器。
// digitalWrite(0, 0); // 默认上电是开 低电频触发
Serial.println();
Serial.println();
Serial.print("Connecting to ");
Serial.println(ssid);
// WiFi.begin(ssid, password);
while (WiFi.status() != WL_CONNECTED) {
delay(500);
Serial.print(".");
}
Serial.println("");
Serial.println("WiFi connected");
server.begin();
Serial.println("Server started @ ");
Serial.println(WiFi.localIP());
//打印出IP地址,后期可以制作显示器来外部硬件显示ip
Serial.println("To control GPIO, open your web browser.");
Serial.println("To set GPIO 0 high, type:");
Serial.print(WiFi.localIP());
Serial.println("/gpio/1");
Serial.println("To set GPIO 0 low, type:");
Serial.print(WiFi.localIP());
Serial.println("/gpio/0");
Serial.println("To toggle GPIO 0, type:");
Serial.print(WiFi.localIP());
Serial.println("/gpio/4");
// 初始化blinker
Blinker.begin(auth, ssid, pswd);
BlinkerDuerOS.attachPowerState(duerPowerState); //小度语音操作注册函数
BlinkerMIOT.attachPowerState(miotPowerState); //小爱语音操作注册函数
BlinkerAliGenie.attachPowerState(aligeniePowerState); //天猫语音操作注册函数
Blinker.attachHeartbeat(heartbeat); //app定时向设备发送心跳包, 设备收到心跳包后会返回设备当前状态进行语音操作和app操作同步。
Button1.attach(button1_callback); //app上操作必须的注册回调函数关联按键名“Button1”和判断程序“button1_callback
Button2.attach(button2_callback);
Button3.attach(button3_callback);
}
void loop()
{
Blinker.run();
WiFiClient client = server.available();
if (!client) {
delay(100);
return;
}
String req = client.readStringUntil('\r');
Serial.println(req);
client.flush();
int val;
// 下面开始判断ip进行动作指令
if (req.indexOf("/gpio/on") != -1)
digitalWrite(0, 0);
else if (req.indexOf("/gpio/off") != -1)
digitalWrite(0, 1);
else {
Serial.println("invalid request");
client.print("HTTP/1.1 404\r\n");
client.stop();
return;
}
client.flush();
// Prepare the response
String s = "HTTP/1.1 200 OK\r\nContent-Type: text/html\r\n\r\n<!DOCTYPE HTML>\r\n<html>\r\nWelcome wenzheng space! ";
s += "</html>\n";
client.print(s);
delay(1);
Serial.println("Client disonnected");
}
//以下是点灯APP配置界面

// {¨config¨{¨headerColor¨¨transparent¨¨headerStyle¨¨light¨¨background¨{¨img¨¨assets/img/headerbg.jpg¨¨isFull¨«}}¨dashboard¨|{¨type¨¨btn¨¨ico¨¨fal fa-lightbulb-on¨¨mode¨É¨t0¨´´¨t1¨¨文本2¨¨bg¨Ë¨cols¨Í¨rows¨Í¨key¨¨btn-abc¨´x´Ë´y´Ë¨speech¨|÷¨lstyle¨Ë¨clr¨¨#FFF¨}{ßAßBßC¨fal fa-power-off¨ßEÉßF¨开灯¨ßGßHßIËßJÍßKÍßL¨btn-on¨´x´É´y´ÏßN|{¨cmd¨¨打开寝室灯¨¨act¨¨on¨}÷ßOËßP¨#00A90C¨}{ßAßBßCßRßEÉßF¨关灯¨ßGßHßIËßJÍßKÍßL¨btn-off¨´x´Í´y´ÏßN|{ßU¨关闭寝室灯¨ßW¨off¨}÷ßOËßP¨#EA0909¨}÷¨actions¨|÷¨triggers¨|÷}
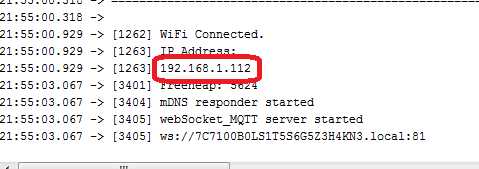
下载好程序 ,打开串口监视器,复位8266
改写地址

记住这个地址 192.168.1.112 我的是这个地址 ,每个人的都不一样,自己记住
下面是ios捷径的配置(请用苹果内置浏览器打开):
开灯
https://www.icloud.com/shortcuts/738ab973d2024d6a97c2692638bbd809?from=singlemessage&isappinstalled=0
关灯
https://www.icloud.com/shortcuts/8e25019a47604bb794856e5317ca7a30?from=singlemessage&isappinstalled=0
打开快捷指令

给这个地址改成自己的

点右上角的完成就可以了
三大精灵和siri就都可以控制了
|