|
|
点灯科技是一个对于新手来说非常好的平台
它集成了开发操作远程控制
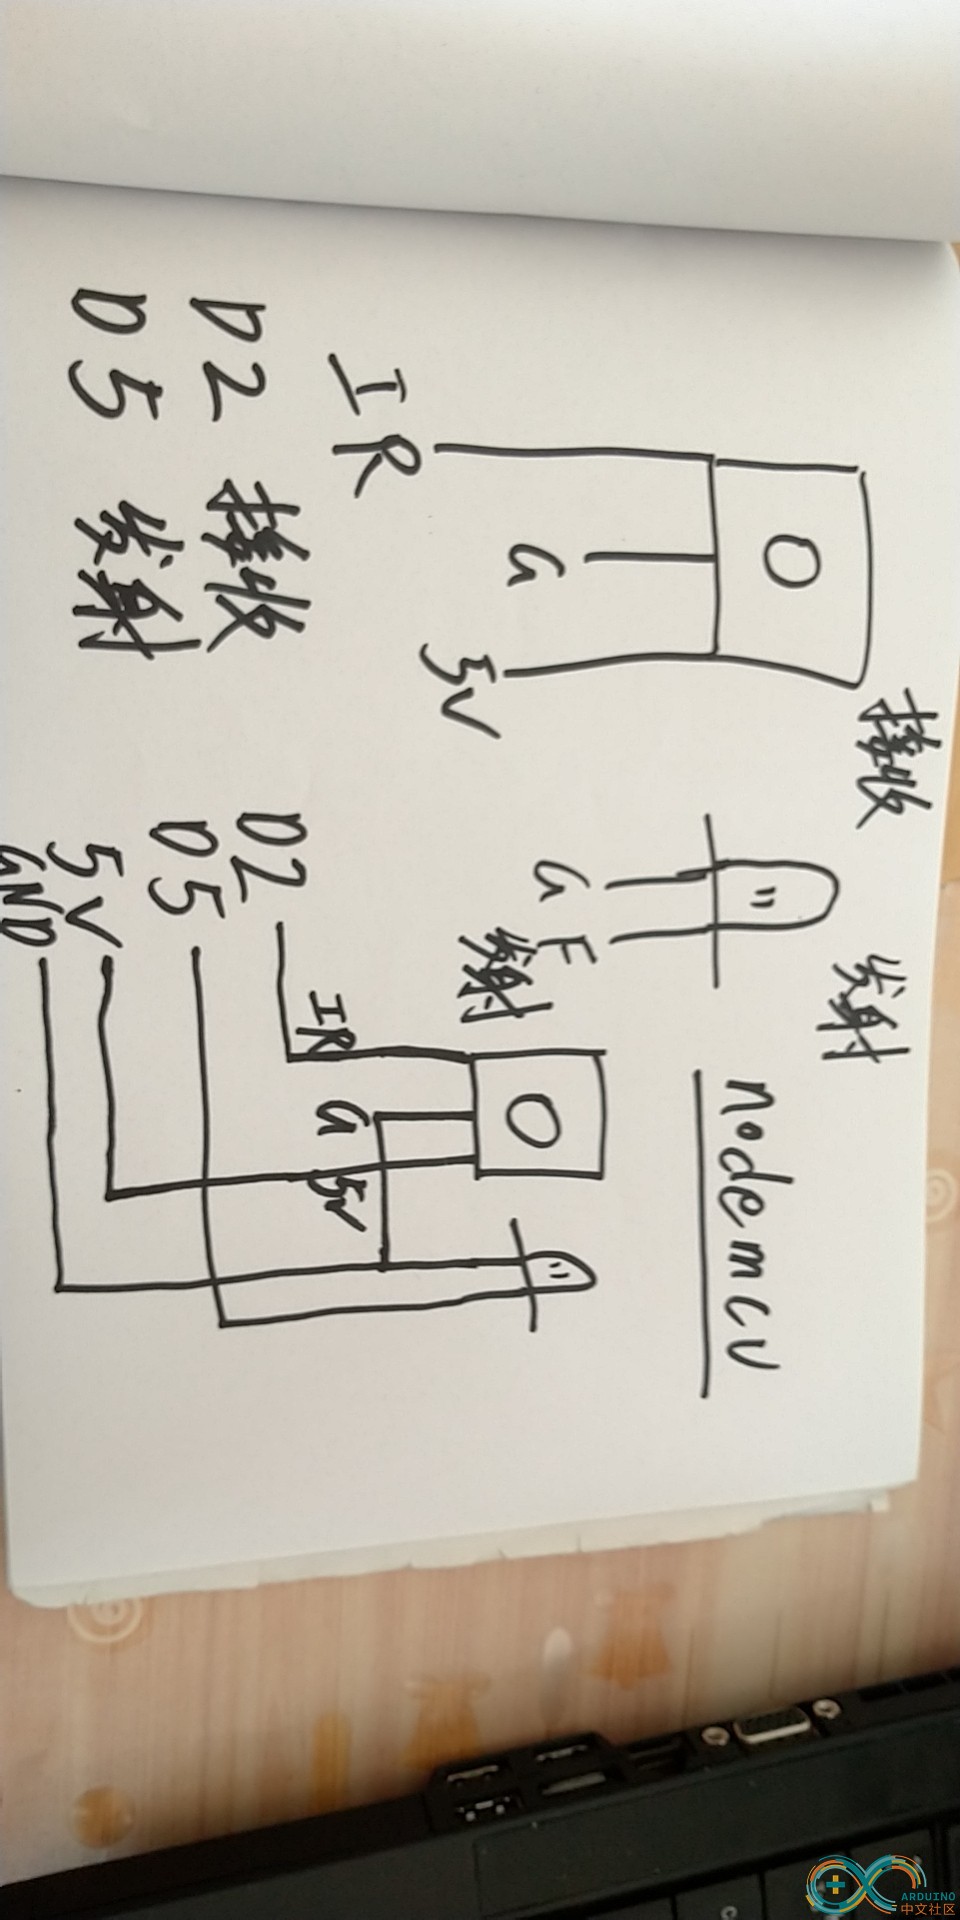
我这里使用了nodemcu,所以发射引脚设为D5接收设为D2(其他开发板请自定义)
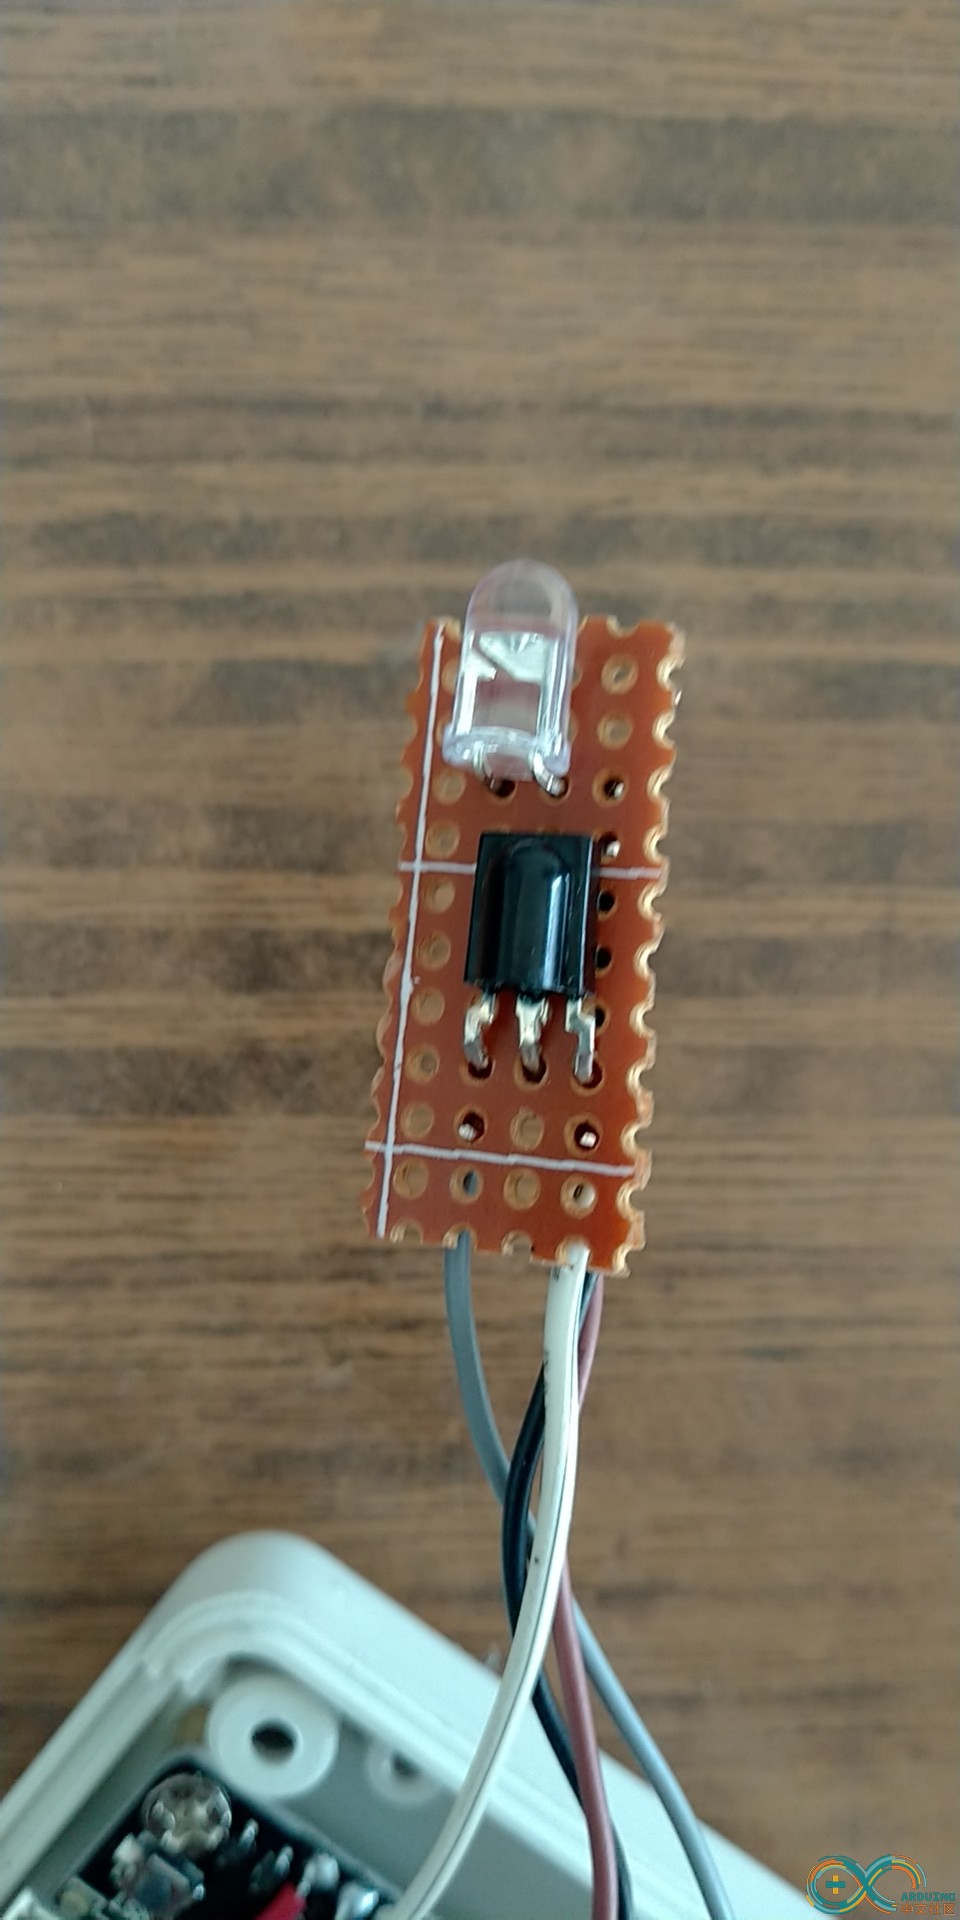
本人修电器手头有接收头和发射头,没有这俩电子元件请购买或从遥控器上拆
电路图
接收发射头做成的样子
硬件做成后到程序代码部分,在这里感谢爆改车间提供的代码。
代码如下
[md]#define BLINKER_WIFI
#include <Arduino.h>
#include <IRremoteESP8266.h>
#include <IRrecv.h>
#include <IRsend.h>
#include <IRutils.h>
#include <EEPROM.h>
#include <Blinker.h>
const uint16_t kIrLed = D5; //esp01的gpio03接口(RX接口)
uint16_t RECV_PIN = D2; //esp01的gpio2接口
IRsend irsend(kIrLed); // 定义红外发射端接口 接红外发射器的正极
IRrecv irrecv(RECV_PIN); //定义红外接收端口
decode_results results;
char auth[] = "设备码"; //key
char ssid[] = "无线名称"; //ssid
char pswd[] = "无线密码"; //password
BlinkerButton Button0("btn-xuexi"); //学习开关数据键名
BlinkerButton Button1("btn-f"); //发射键数据键名
bool xuexi = false;
void dataRead(const String & data)
{
BLINKER_LOG("Blinker readString: ", data);
Blinker.vibrate();
uint32_t BlinkerTime = millis();
Blinker.print("millis", BlinkerTime);
}
decode_type_t protocol;
uint16_t size;
const uint16_t kFrequency = 38000;
bool success = true;
String modedate;
String bitdate;
String date;
void button0_callback(const String & state)
{
if(state == "on"){
Serial.println("开");
xuexi = true;
Button0.print("on");
Blinker.delay(100);
Blinker.println("开始接收");
}else if (state == "off"){
Serial.println("关");
xuexi = false;
Button0.print("off");
Blinker.delay(100);
Blinker.println("停止接收");
}
}
void button1_callback(const String & state)
{
Serial.println(state);
Serial.println(state.substring(0,state.indexOf(',')));
Serial.println(state.substring(state.indexOf(',')+1,state.lastIndexOf(',')));
Serial.println(state.substring(state.lastIndexOf(',')+1));
String modes = state.substring(0,state.indexOf(','));
char zhi[5] ;
strcpy(zhi,state.substring(state.indexOf(',')+1,state.lastIndexOf(',')).c_str());
int data;
sscanf(zhi, "%x", &data);
int b = state.substring(state.lastIndexOf(',')+1).toInt();
Serial.println(data);
Serial.println(b);
//irsend.sendRC5(data,b);
if (modes == "NEC") {
irsend.sendNEC(data,b);
} else if (modes == "SONY") {
irsend.sendSony(data,b);
} else if (modes == "RC5") {
irsend.sendRC5(data,b);
} else if (modes == "RC6") {
irsend.sendRC6(data,b);
} else if (modes == "RCMM") {
irsend.sendRCMM(data,b);
} else if (modes == "PANASONIC") {
irsend.sendPanasonic(data,b);
} else if (modes == "LG") {
irsend.sendLG(data,b);
} else if (modes == "JVC") {
irsend.sendJVC(data,b);
} else if (modes == "AIWA_RC_T501") {
irsend.sendAiwaRCT501(data,b);
} else if (modes == "WHYNTER") {
irsend.sendWhynter(data,b);
} else if (modes == "NIKAI") {
irsend.sendNikai(data,b);
}
}
void dump(decode_results *results) {
uint16_t count = results->rawlen;
if (results->decode_type == UNKNOWN) {
modedate = "Unknown encoding: ";
} else if (results->decode_type == NEC) {
modedate ="NEC";
} else if (results->decode_type == SONY) {
modedate ="SONY";
} else if (results->decode_type == RC5) {
modedate ="RC5";
} else if (results->decode_type == RC5X) {
modedate ="RC5X";
} else if (results->decode_type == RC6) {
modedate ="RC6";
} else if (results->decode_type == RCMM) {
modedate ="RCMM";
} else if (results->decode_type == PANASONIC) {
modedate ="PANASONIC";
Serial.print(results->address, HEX);
Serial.print(" Value");
} else if (results->decode_type == LG) {
modedate ="LG";
} else if (results->decode_type == JVC) {
modedate ="JVC";
} else if (results->decode_type == AIWA_RC_T501) {
modedate ="AIWA RC T501";
} else if (results->decode_type == WHYNTER) {
modedate ="Whynter";
} else if (results->decode_type == NIKAI) {
modedate ="Nikai";
}
date = uint64ToString(results->value, 16);
bitdate = results->bits;
modedate.concat(",");
modedate.concat(date);
modedate.concat(",");
modedate.concat(bitdate);
Blinker.println(modedate);
}
void setup()
{
Serial.begin(115200);
BLINKER_DEBUG.stream(Serial);
Blinker.begin(auth, ssid, pswd);
Blinker.attachData(dataRead);
Blinker.delay(10);
irsend.begin();
irrecv.enableIRIn();
}
void loop()
{
Blinker.run();
Button0.attach(button0_callback);
Button1.attach(button1_callback);
if(xuexi==true){
if (irrecv.decode(&results)) {
dump(&results);
irrecv.resume();
}
}
}
以上代码需要根据开发板更改部分,还需要到库管理添加有关 IRremote 的库文件不然编译时会报错。直接到库管理器搜索 IRremote,相关的最好都安装上防止报错
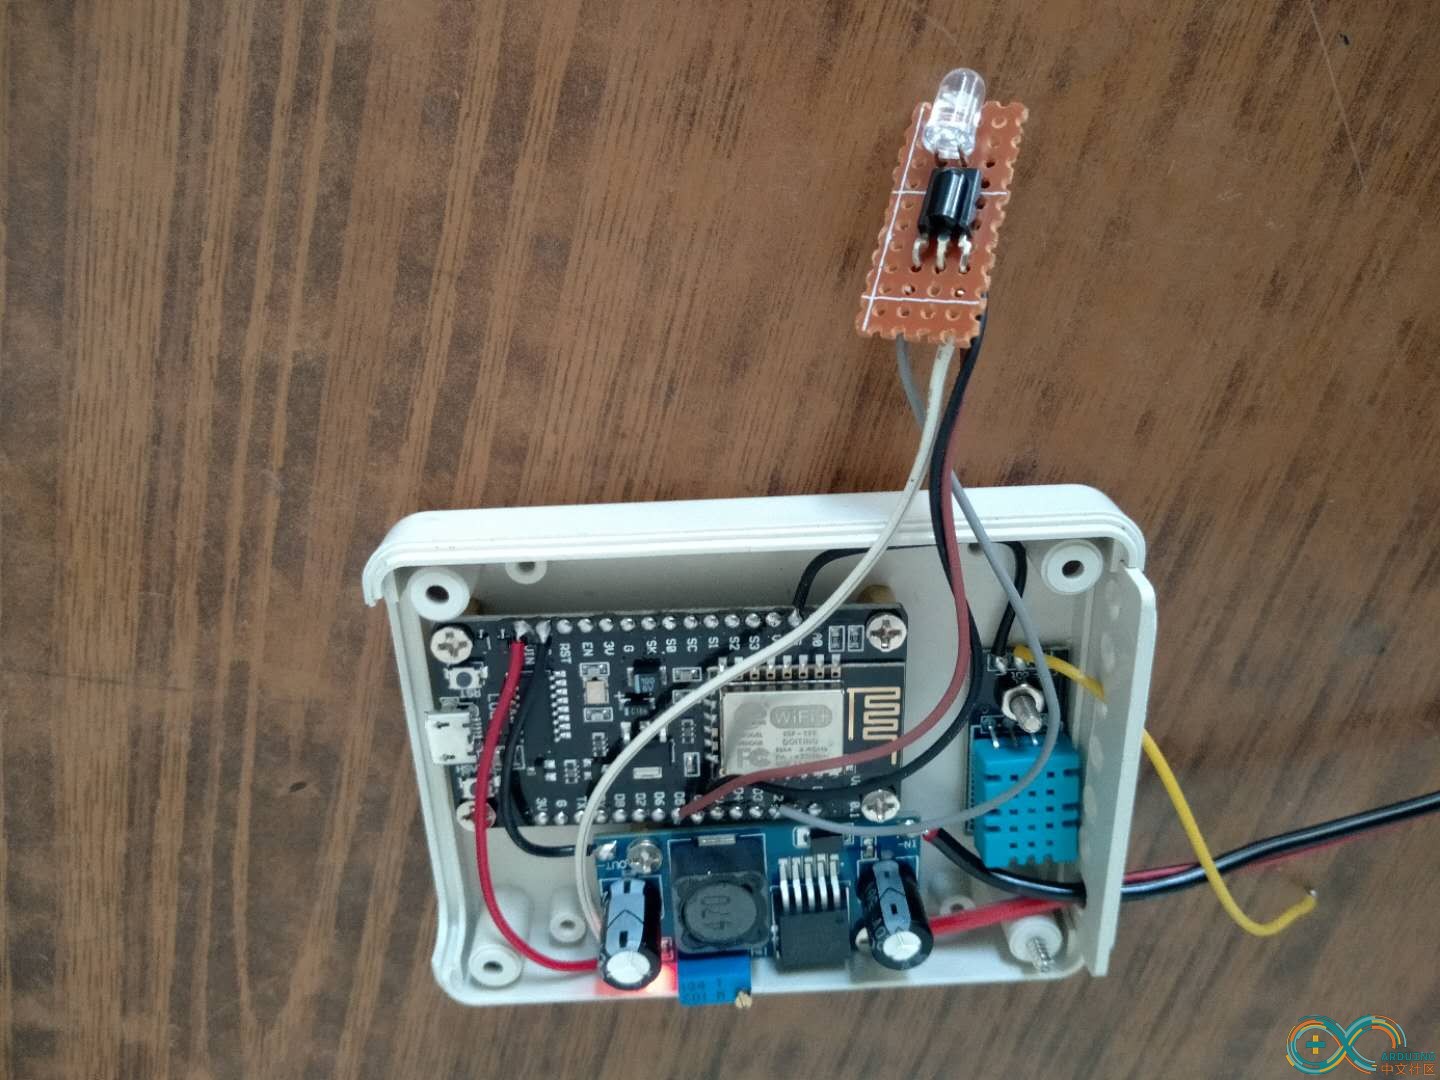
这是与开发板链接好后的样子,根据引脚连接到开发板
具体学习添加的方法
1先添加一个学习的按键,将数据键名改为 btn-xuexi
2再添加一个调试窗口,点一下学习按键后遥控器对接收头按下学习窗口会弹出 NEC为开头的一串代码
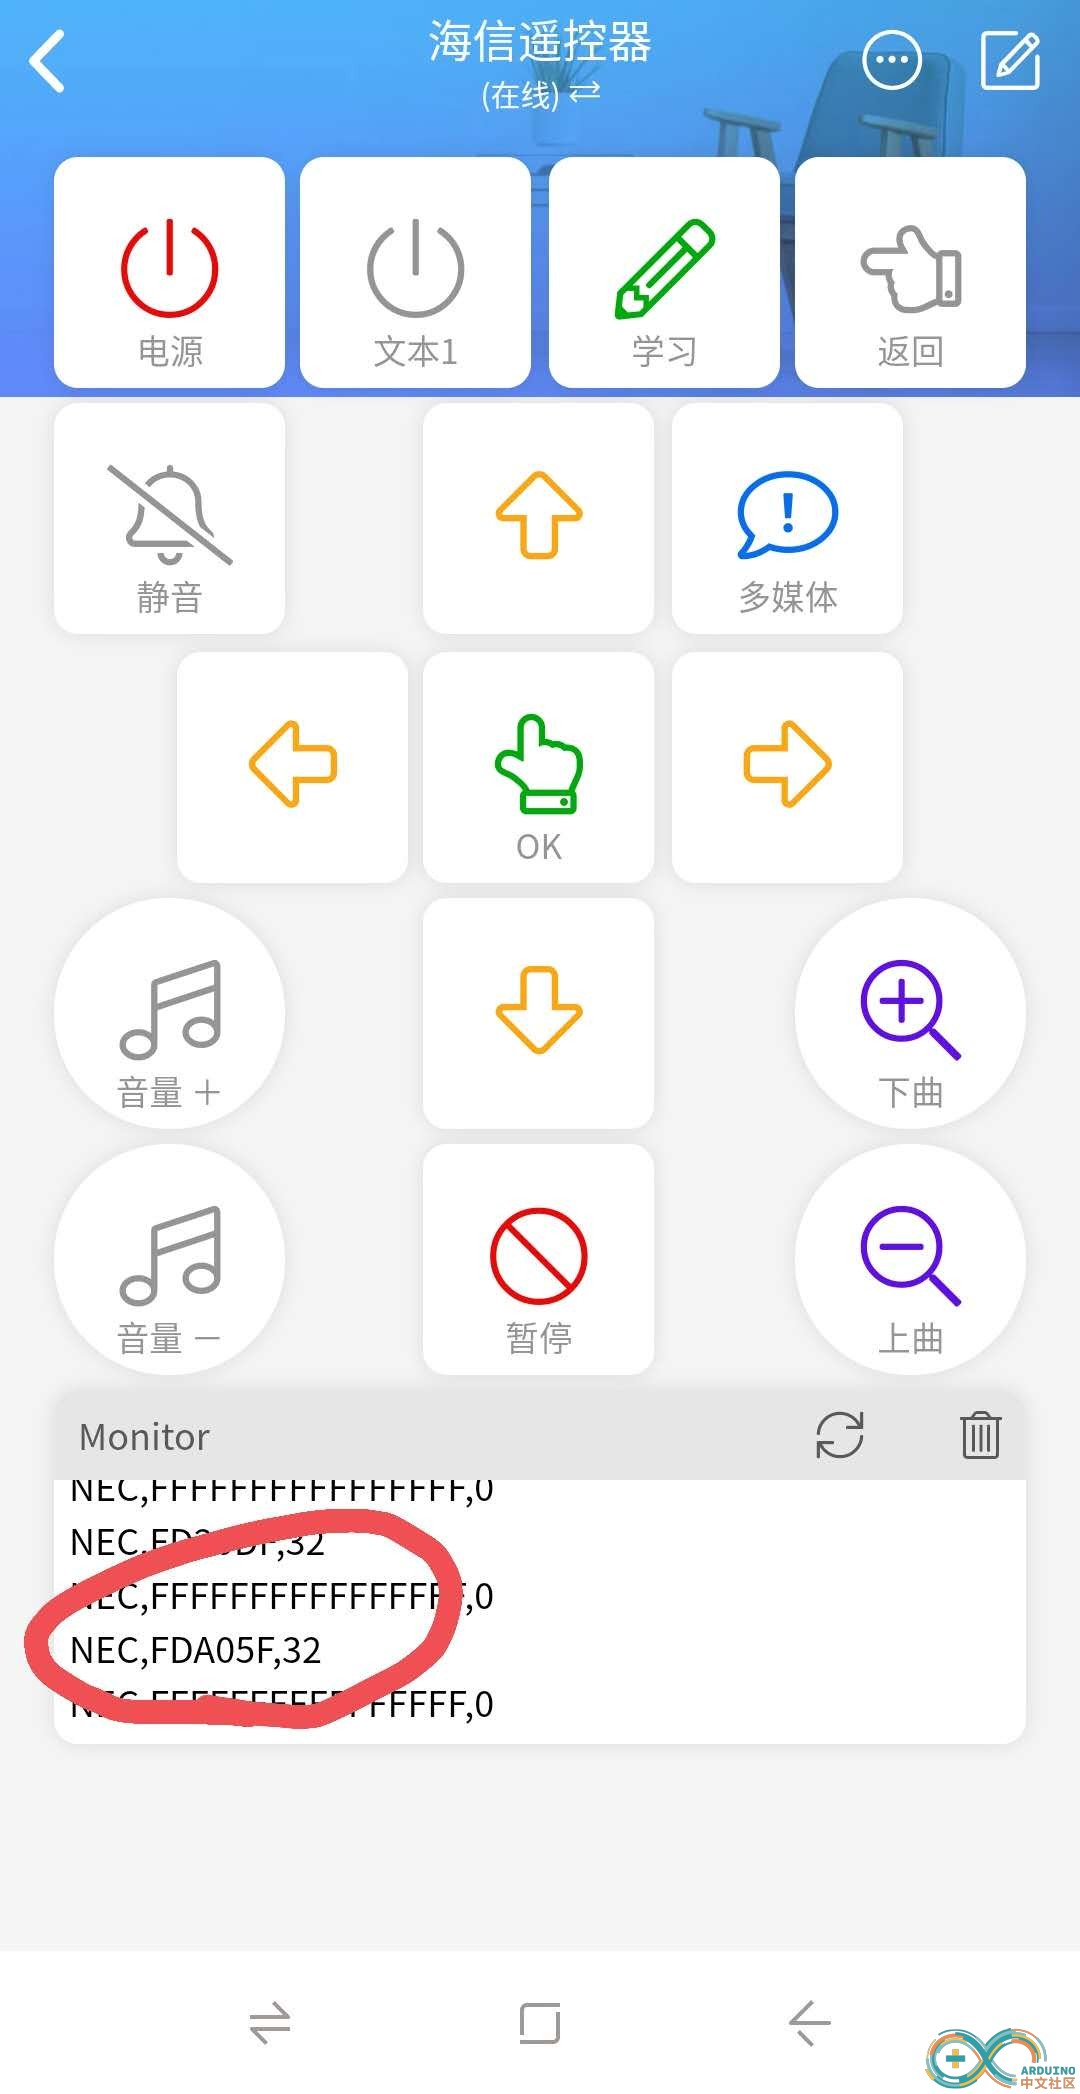
3再添加一个按键将 btn-f 添加到数据键名,按键类型设置为自定义
4将此代码复制到新添加的按键的 承载内容里
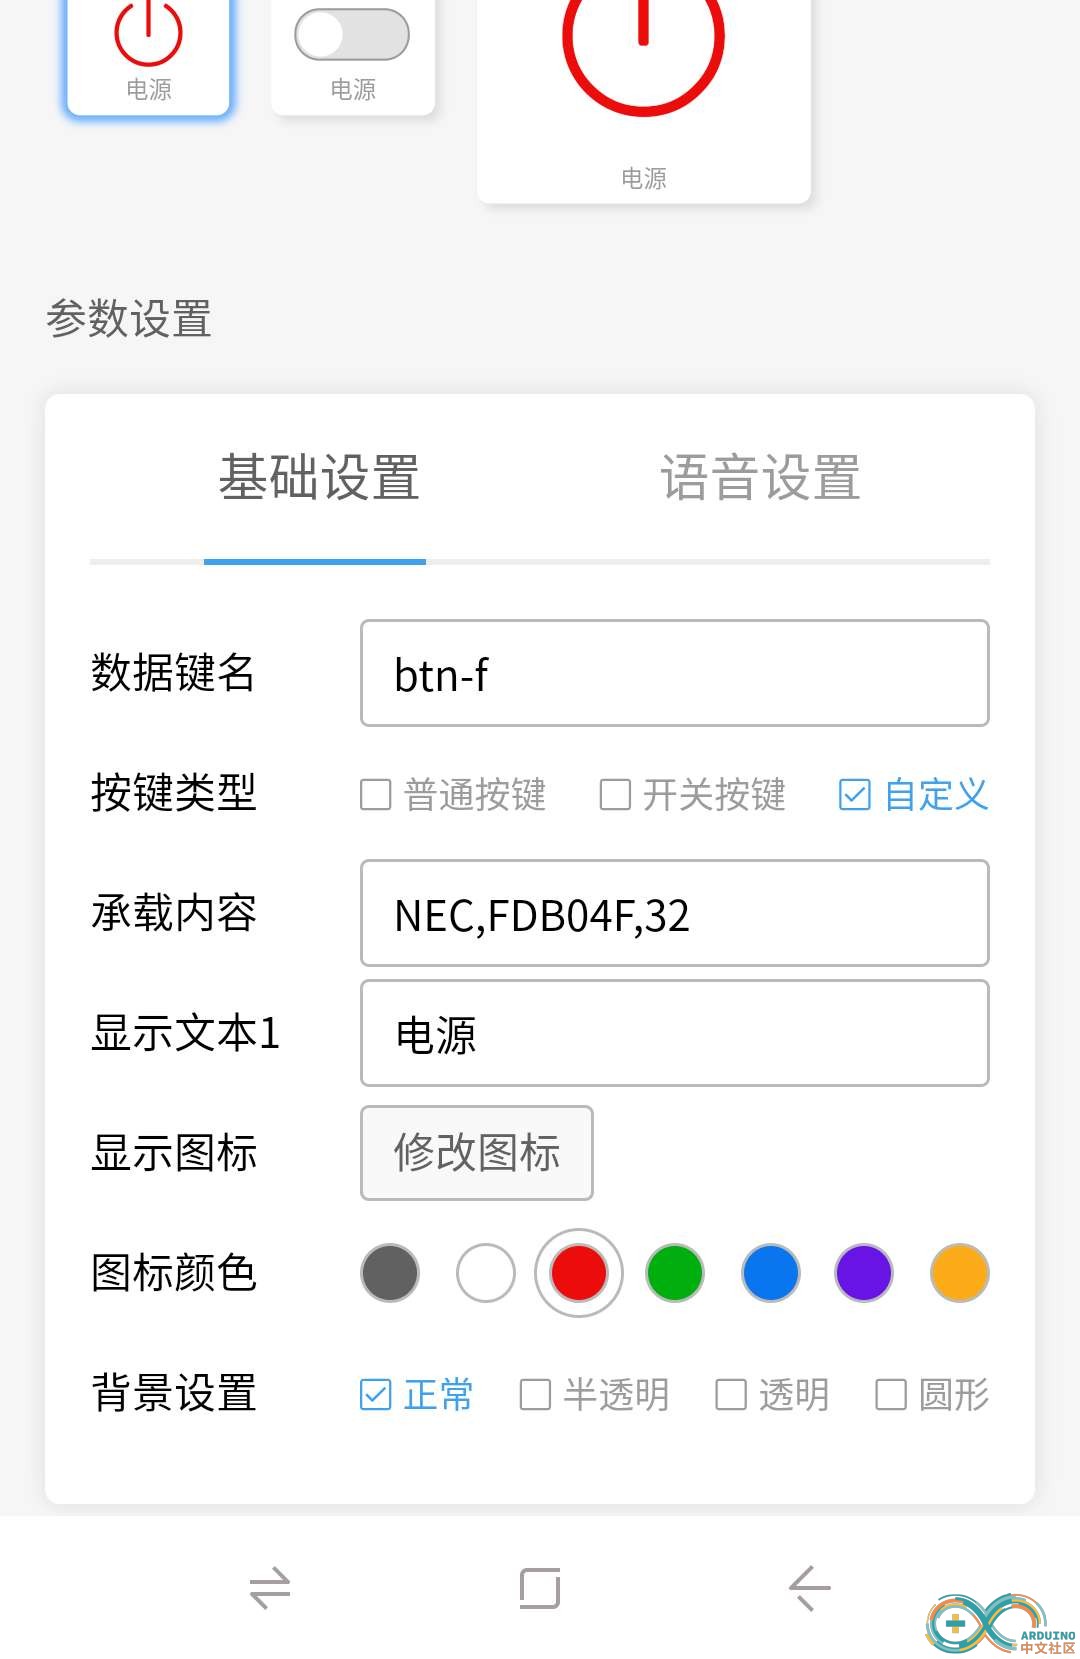
重复2.3.4.步骤可以添加多个按键,学习按键只需要一个
此时对电视操作一下就实现学习与发射了,基本所有带红外的遥控器都能用
学习了一个海信电视的基本功能
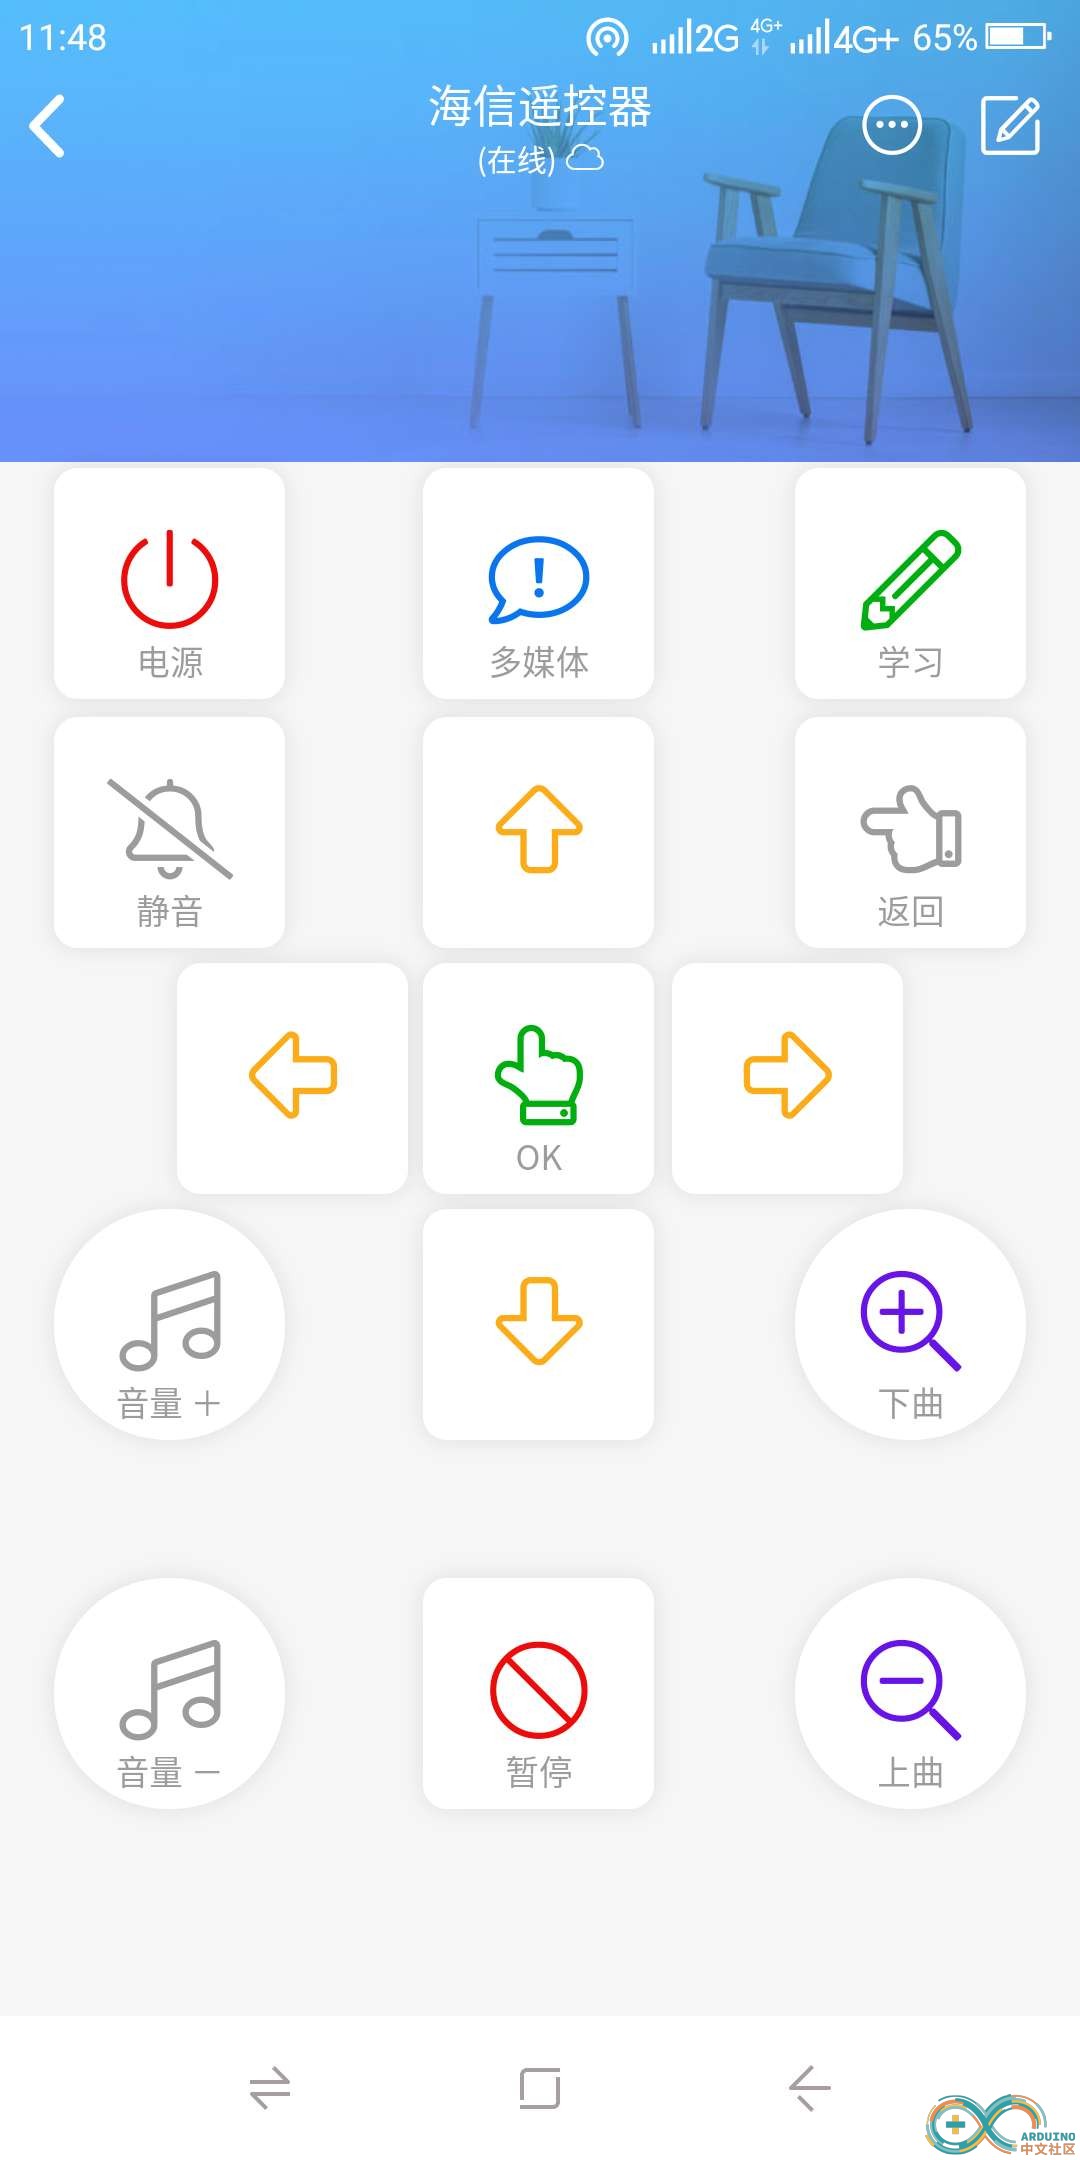
新手第一次发帖,全部手打。不对的地方请多多指正!
|
|