本作品是一个基于机器视觉的智能机械臂操作平台,其采用atmega32单片机作为主控制系统并通过串口与视觉识别模块进行通讯;控制系统使用12V5A开关电源供电;机械臂是一个六关节机械臂,六个伺服电机分别驱动六个关节转动,主控制系统控制六个伺服电机实现机械臂空间复杂运动。该智能平台实现了,对不同大小,颜色,二维码等目标物品的识别,按指令进行分类、抓取、搬移等动作。

一. 机械臂部分1.材料
MG996R 996 舵机 *6长U型支架单轴舵机支架 *3
U型梁 *2
S3115通用支架 *5 L型支架单轴 *1 金属 机械手臂 夹持器 *1
M3螺丝螺母若干
2.组装


3.驱动板
驱动板用的是申请的KittenBot家的RosBot机器人开发板,图像化 编程还是很好用的。


4.程序
void setup(){
Serial.begin(9600);
kb.init();
pinMode(A0, INPUT);
kb.servoArray(2, 160, 10);
delay(1*1000);
kb.servoArray(3, 160, 10);
delay(1*1000);
kb.servoArray(4, 10, 10);
delay(1*1000);
kb.servoArray(5, 90, 5);
delay(1*1000);
kb.servoArray(3, 90, 10);
kb.servoArray(4, 10, 10);
kb.servoArray(0, 90, 10);
kb.servoArray(1, 70, 10);
kb.servoArray(2, 70, 10);
kb.servoArray(3, 80, 10);
delay(1*1000);
kb.servoArray(5, 180, 10);
delay(3*1000);
}
void loop(){
char val = Serial.read();
if(val == '1'){
delay(1*1000);
kb.servoArray(0, 125, 10);
delay(1*1000);
kb.servoArray(2, 130, 20);
kb.servoArray(4, 20, 20);
kb.servoArray(5, 145, 5);
delay(1*1000);
kb.servoArray(1, 160, 20);
delay(2*1000);
kb.servoArray(0, 100, 20);
delay(2*1000);
kb.servoArray(4, 10, 10);
kb.servoArray(0, 90, 10);
kb.servoArray(1, 70, 10);
kb.servoArray(2, 70, 10);
kb.servoArray(3, 80, 10);
delay(1*1000);
kb.servoArray(5, 180, 10);
}
if(val == '2'){
delay(1*1000);
kb.servoArray(0, 125, 10);
delay(1*1000);
kb.servoArray(4, 30, 10);
kb.servoArray(3, 135, 10);
delay(1*1000);
kb.servoArray(5, 130, 10);
kb.servoArray(2, 70, 10);
delay(1*1000);
kb.servoArray(1, 160, 20);
delay(2*1000);
kb.servoArray(0, 100, 20);
delay(2*1000);
kb.servoArray(4, 10, 10);
kb.servoArray(0, 90, 10);
kb.servoArray(1, 70, 10);
kb.servoArray(2, 70, 10);
kb.servoArray(3, 80, 10);
kb.servoArray(5, 180, 10);
}
if(val == '3'){
delay(1*1000);
kb.servoArray(0, 120, 10);
delay(1*1000);
kb.servoArray(4, 20, 10);
kb.servoArray(3, 130, 10);
delay(1*1000);
kb.servoArray(5, 115, 10);
kb.servoArray(2, 55, 10);
delay(1*1000);
kb.servoArray(1, 160, 20);
delay(2*1000);
kb.servoArray(0, 100, 20);
delay(2*1000);
kb.servoArray(4, 10, 10);
kb.servoArray(0, 90, 10);
kb.servoArray(1, 70, 10);
kb.servoArray(2, 70, 10);
kb.servoArray(3, 80, 10);
kb.servoArray(5, 180, 10);
}
}
[/mw_shl_code]
二. 传送带部分

1.材料
35步进电机 *1M8丝杆20cm *2
联轴器5X8 *1
丝杆固定轴承 *4
A4纸 *1
A4988驱动板 *1
ARDUINO PRO MINI *1
12V1A电源 *1
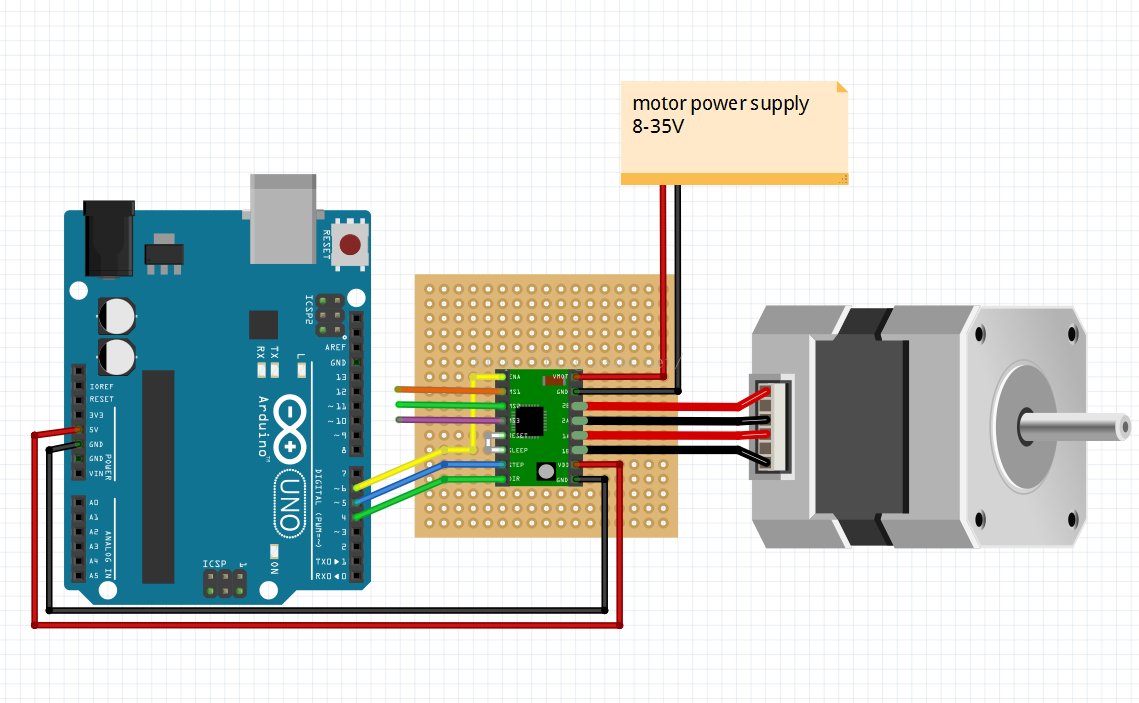
2.驱动电路

3.程序
[mw_shl_code=arduino,true]#include <Servo.h>
Servo servo1;
void setup()
{
servo1.attach(5);
Serial.begin(9600);
}
void loop()
{
int angle = analogRead(A0);
angle = map(angle, 0, 1023, 0, 180);
Serial.print("angle = ");
Serial.println(angle);
servo1.write(angle);
delay(15);
}[/mw_shl_code]
三. 视觉部分
视觉模块是参考开源的OPENMV绘制的PCB,采用基于OPENMV的图像识别模块,主控为STM32F767,工作频率可达260MHZ,摄像头使用0V7725,30W像素。机器视觉识别系统的主控芯片STM32F767通过串口通信方式与主控制系统ATMEGA32单片机传输信息
1.材料
OPENMV *1
2.原理图

3.AprilTag标签识别原理


AprilTag是一个视觉基准系统,可用于各种任务,包括AR,机器人和相机校准。这个Tag可以直接用打印机打印出来,而AprilTag检测程序可以计算相对于相机的精确3D位置,方向和ID。在机器人领域有广泛应用。AprilTag的算法,可以计算出Tag在3维空间中的位置, 与其对应的ID。
4.颜色识别功能
颜色识别是通过识别指定物品的色块,返回色块的值给主控,主控再根据返回的信息控制机械臂执行相应的动作。
4.程序
①标签识别
[mw_shl_code=python,true]# AprilTags Example
#
# This example shows the power of the OpenMV Cam to detect April Tags
# on the OpenMV Cam M7. The M4 versions cannot detect April Tags.
import sensor, image, time, math
sensor.reset()
sensor.set_pixformat(sensor.RGB565)
sensor.set_framesize(sensor.QQVGA) # we run out of memory if the resolution is much bigger...
sensor.skip_frames(time = 2000)
sensor.set_auto_gain(False) # must turn this off to prevent image washout...
sensor.set_auto_whitebal(False) # must turn this off to prevent image washout...
clock = time.clock()
# Note! Unlike find_qrcodes the find_apriltags method does not need lens correction on the image to work.
# The apriltag code supports up to 6 tag families which can be processed at the same time.
# Returned tag objects will have their tag family and id within the tag family.
tag_families = 0
tag_families |= image.TAG16H5 # comment out to disable this family
tag_families |= image.TAG25H7 # comment out to disable this family
tag_families |= image.TAG25H9 # comment out to disable this family
tag_families |= image.TAG36H10 # comment out to disable this family
tag_families |= image.TAG36H11 # comment out to disable this family (default family)
tag_families |= image.ARTOOLKIT # comment out to disable this family
#print("Tag Family %s, Tag ID %d, rotation %f (degrees)" % print_args)
#print(clock.fps())
# What's the difference between tag families? Well, for example, the TAG16H5 family is effectively
# a 4x4 square tag. So, this means it can be seen at a longer distance than a TAG36H11 tag which
# is a 6x6 square tag. However, the lower H value (H5 versus H11) means that the false positve
# rate for the 4x4 tag is much, much, much, higher than the 6x6 tag. So, unless you have a
# reason to use the other tags families just use TAG36H11 which is the default family.
def family_name(tag):
if(tag.family() == image.TAG16H5):
return "TAG16H5"
if(tag.family() == image.TAG25H7):
return "TAG25H7"
if(tag.family() == image.TAG25H9):
return "TAG25H9"
if(tag.family() == image.TAG36H10):
return "TAG36H10"
if(tag.family() == image.TAG36H11):
return "TAG36H11"
if(tag.family() == image.ARTOOLKIT):
return "ARTOOLKIT"
while(True):
clock.tick()
img = sensor.snapshot()
for tag in img.find_apriltags(families=tag_families): # defaults to TAG36H11 without "families".
img.draw_rectangle(tag.rect(), color = (255, 0, 0))
img.draw_cross(tag.cx(), tag.cy(), color = (0, 255, 0))
print_args = (family_name(tag), tag.id(), (180 * tag.rotation()) / math.pi)
print("Tag Family %s, Tag ID %d, rotation %f (degrees)" % print_args)
print(clock.fps)
[/mw_shl_code]
②颜色识别
[mw_shl_code=python,true]# Multi Color Blob Tracking Example
#
# This example shows off multi color blob tracking using the OpenMV Cam.
import sensor, image, time
# Color Tracking Thresholds (L Min, L Max, A Min, A Max, B Min, B Max)
# The below thresholds track in general red/green things. You may wish to tune them...
thresholds = [(0, 100, 51, 127, -3, 127), # generic_red_thresholds
(0, 100, -128, -19, -128, 127), # generic_green_thresholds
(39, 100, -63, 13, -128, -16)] # generic_blue_thresholds
# You may pass up to 16 thresholds above. However, it's not really possible to segment any
# scene with 16 thresholds before color thresholds start to overlap heavily.
sensor.reset()
sensor.set_pixformat(sensor.RGB565)
sensor.set_framesize(sensor.QVGA)
sensor.skip_frames(time = 2000)
sensor.set_auto_gain(False) # must be turned off for color tracking
sensor.set_auto_whitebal(False) # must be turned off for color tracking
clock = time.clock()
# Only blobs that with more pixels than "pixel_threshold" and more area than "area_threshold" are
# returned by "find_blobs" below. Change "pixels_threshold" and "area_threshold" if you change the
# camera resolution. Don't set "merge=True" becuase that will merge blobs which we don't want here.
while(True):
clock.tick()
img = sensor.snapshot()
for blob in img.find_blobs(thresholds, pixels_threshold=800, area_threshold=1500):
img.draw_rectangle(blob.rect(), color = (255, 0, 0))#red
img.draw_string(100,100,'red', color=(255,0,0))
img.draw_cross(blob.cx(), blob.cy())
# print(clock.fps())
# print(blob.code())
[/mw_shl_code]
五. 总结
最后总结一下,做这个项目画了两个月时间,其中也是花费了很大精力,学到不少东西,整个项目制作,编程,视频剪辑都是我一人完成。最后,谢谢大家的支持!
|
 [复制链接]


 发表于 2019-3-20 22:28


 hug:
hug: