本帖最后由 Lily 于 2014-3-28 13:05 编辑
 pcDuino + TMP36可以实现全天候的温度监控,而且由于pcDuino本身的功率也不大所以即使一直开着耗电也不会很高。再配合yeelink把传感器的数据定时传送到网上。我们就可以随时随地的查看办公室的温度状态了。
一、准备工作
1.pcDuino v2 一块 2.面包板一块 3.TMP36传感器一块 4.3.3K色环电阻一个 5.杜邦线若干 二、pcDuino连接TMP36
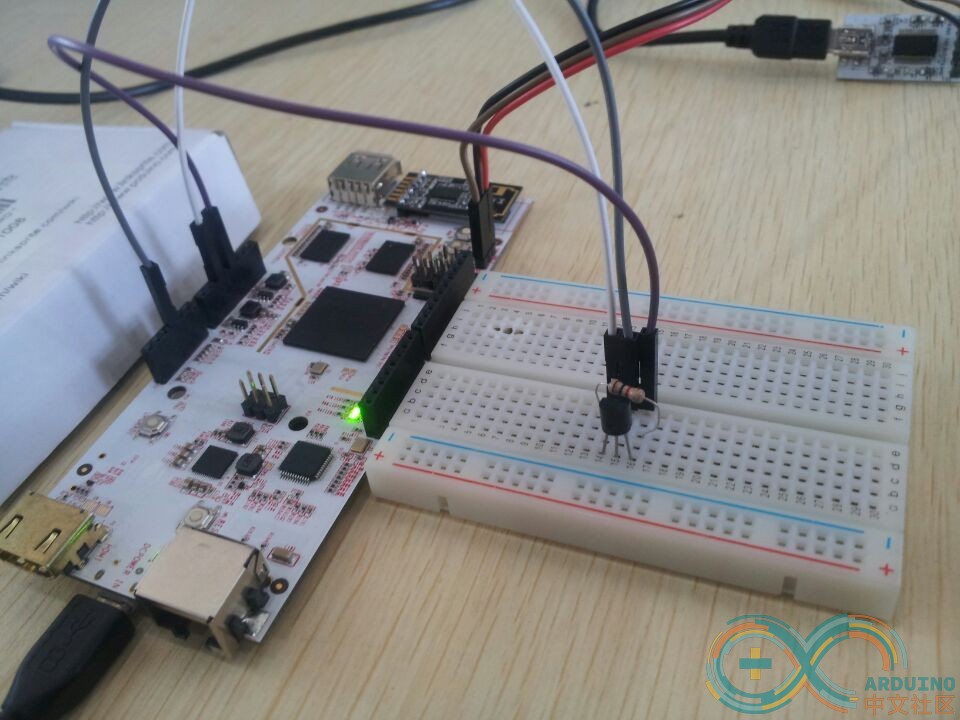
 上图就是TMP36的俯视图,从左至右对应的引脚为VCC VOUT GND首先我们要把TMP36的VCC VOUT GND对应连接pcDuino的+3v A5 GND脚
然后把电阻接在TMP36的VCC和GND之间起一个分流作用防止元器件损坏。连接好的效果如下

三、编写代码:#include <core.h> #define aref_voltage 3
const int tmpPin = A2; char buffer[50]; int tmpReading;
void setup(){ } void loop(){ tmpReading = analogRead(tmpPin); printf ("tmpReading = %d\n",tmpReading); float voltage = tmpReading * aref_voltage; voltage /= 4096; float tmpC = (voltage - 0.5) * 100; sprintf (buffer, "{\"value\":%4.2f}\n", tmpC); FILE* fp = fopen ("/home/ubuntu/datafile.txt","w+"); fwrite (buffer, sizeof(char), strlen(buffer), fp); fclose (fp); exit (0); }
四、编译代码 获取arduino风格的API:详细步骤(点击绿色字体查看详细) 然后创建一个文件把以上的代码放入到文件中,文件名为tmp36_yeelink.c(也可以改成其他的,但是后面要同步修改Makefile文件)点击下载tmp36_yeelink
然后把该文件放到下载好的c_enviroment下的sample目录下(***是你存放c_enviroment文件夹和tmp36_yeelink.c的路径) [backcolor=white !important][backcolor=white !important]1
| [backcolor=white !important]$ cp ***/tmp36_yeelink.c ***/c_enviroment/sample
|
然后修改Makefile [backcolor=white !important][color=white !important][backcolor=rgb(108, 226, 108) !important][color=white !important] ?
[backcolor=white !important]1
| [backcolor=white !important]$ vi Makefile
|
在一大串OBJS+= ***的后面加上一个 [backcolor=white !important][color=white !important][backcolor=rgb(108, 226, 108) !important][color=white !important] ?
[backcolor=white !important]1
| [backcolor=white !important]OBJS+=tmp36_yeelink
|
然后保存退出,输入make开始编译 [backcolor=white !important][color=white !important][backcolor=rgb(108, 226, 108) !important][color=white !important] ?
[backcolor=white !important]1
| [backcolor=white !important]$ make
|
这样我们就把传感器的传出的模拟值转换成温度然后以JSON格式存放到data_file.txt文件中了 五、curl命令传送传感器的值到yeelink curl是利用URL语法在命令行方式下工作的开源文件传输工具新建一个脚本文件名叫yeelink.sh,然后写入以下代码到文件中。(对应的APIKEY和URL要根据自己的情况修改,还有tmp36_yeelink文件的存储位置
[backcolor=white !important][backcolor=white !important]1
[backcolor=white !important]2
| |
保存退出之后给脚本加上执行权限 [backcolor=white !important][color=white !important][backcolor=rgb(108, 226, 108) !important][color=white !important] ?
[backcolor=white !important]1
| [backcolor=white !important]$ chmod +x yeelink.sh
|
–request <command> 指定要使用的命令
–data-binary 以二进制POST数据
@”…” 和上一条配合使用作用是POST @后面的文件的内容到服务器
–header 自定义头信息传递给服务器
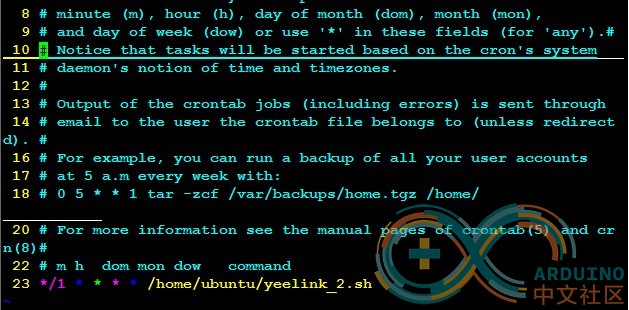
六、周期向yeelink发送传感器的值 crontab指令之前已经有详细介绍,这里就不多赘述了。 输入crontab -e编辑计划任务 [backcolor=white !important][backcolor=white !important]1
| [backcolor=white !important]$ crontab -e
|
添加定时任务 * / 1 * * * * /home/ubuntu/yeelink.sh(下图中是yeelink_2.sh改成yeelink.sh,因为我之前有另外一个yeelink.sh文件防止重名) 添加定时任务* / 1 * * * * /home/ubuntu/yeelink.sh(下图中是yeelink_2.sh改成yeelink.sh,因为我之前有另外一个yeelink.sh文件防止重名)

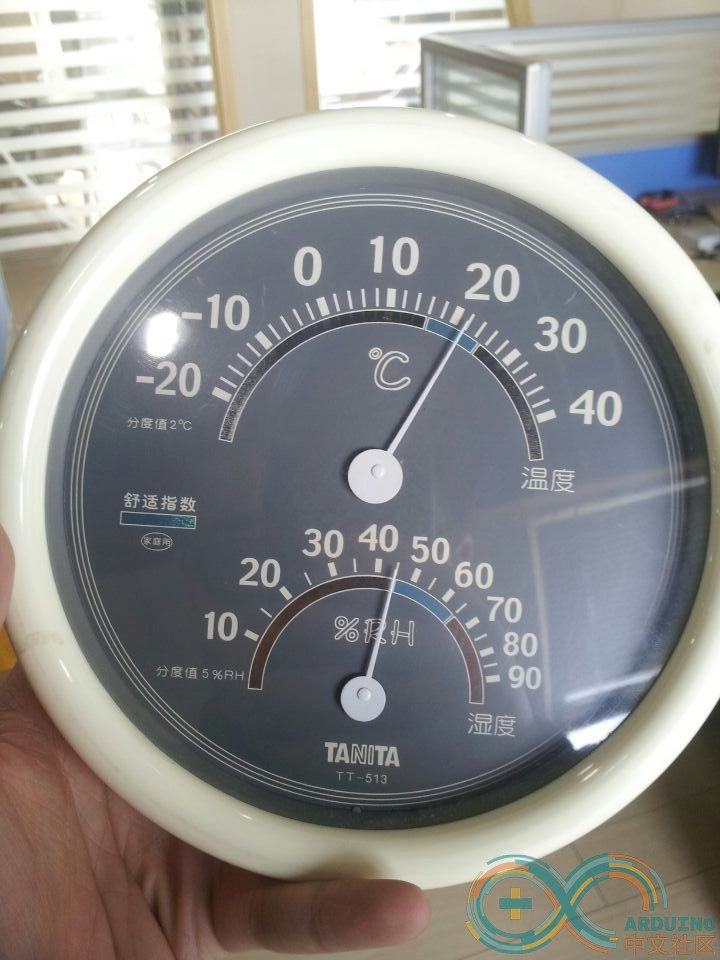
七、结果 先测量一下办公室温度
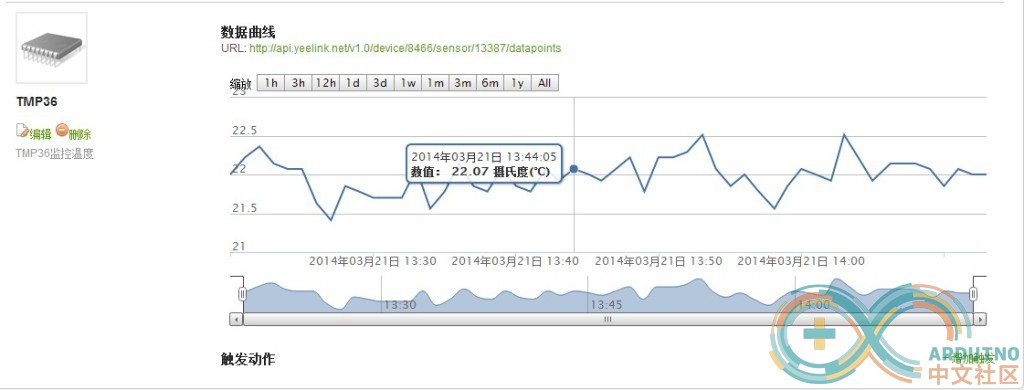
 再看看yeelink上的监控情况

对应的曲线就是我们监控的办公室温度了。
|