|
|
本帖最后由 chenyuechi 于 2020-7-21 18:30 编辑
本教程是通过ESP8266连接云服务器实现远程控制LED灯的亮/灭,只要学会了控制了LED灯,就可以控制其他设备了,开发之前大家需搭好arduino for esp8266的开发环境,具体大家可以看下面两篇帖子:
http://www.arduino.cn/thread-17895-1-1.html
http://www.arduino.cn/thread-17896-1-1.html
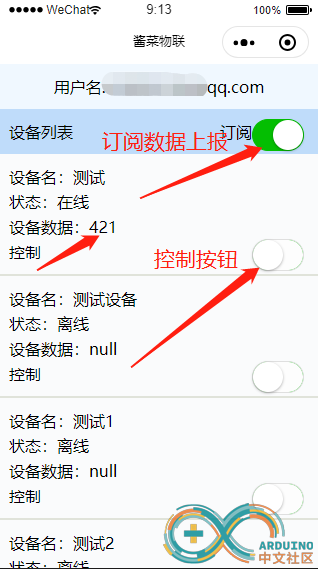
搭好arduino for esp8266开发环境后,大家还需要一个服务器,这样才能实现远程控制,这里我用的是酱菜物联小程序,不需要安装其他的app,方便!可以在微信搜索“酱菜物联”.
esp8266出现以来针对不同的应用环境发布了多个版本,如esp8266-01~esp8266-12e等等不同的版本,但是他们只是应用范围的不同在开发上没有多大区别。几个常见的8266版本esp8266-01、esp8266-12
1、硬件:可以选择以下的任一种
(1)ESP8266-01 ~13 + USB 转 TTL串口模块(如PL2303、CH340)
(2)ESP8266开发板或NodeMCU开发板 + USB数据线
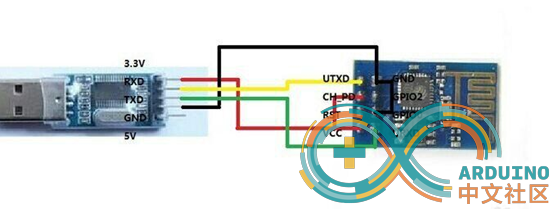
硬件连接如下

ESP8266-01 ~13 + USB 转 TTL串口模块(如PL2303、CH340)
(1)如果wifi模块是ESP8266-01的按以下接线:(按烧写模式接线)
烧写模式接线方法:(用USB转TTL串口连接模块与PC)
esp8266-01 u转串
VCC-----------3.3
GND----------GND
GPIO0--------GND
CH_PD--------3.3
RX-------------TX
TX-------------Rx
其余引脚为空。
烧写模式接线方法:烧写模式时需要将gpio0接地,工作模式时gpio0悬空
(注意有时8266需要独立供电,不直接在ttl取电,很多出现问题都在供电上,别对自己的电源太自信)
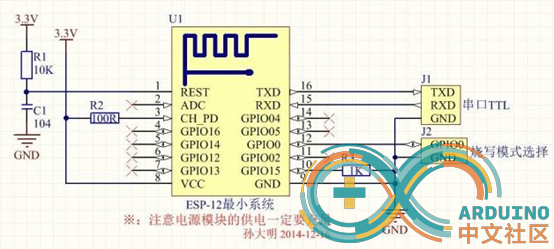
(2)如果wifi模块是ESP8266-07或12的按以下接线:

因为采用mqtt协议,所以程序还依赖pubsubclient和Arduino_JSON库,大家可以在库管理那搜索安装pubsubclient库
代码:
- /*
- Basic ESP8266 MQTT example
- This sketch demonstrates the capabilities of the pubsub library in combination
- with the ESP8266 board/library.
- It connects to an MQTT server then:
- - publishes "hello world" to the topic "outTopic" every two seconds
- - subscribes to the topic "inTopic", printing out any messages
- it receives. NB - it assumes the received payloads are strings not binary
- - If the first character of the topic "inTopic" is an 1, switch ON the ESP Led,
- else switch it off
- It will reconnect to the server if the connection is lost using a blocking
- reconnect function. See the 'mqtt_reconnect_nonblocking' example for how to
- achieve the same result without blocking the main loop.
- To install the ESP8266 board, (using Arduino 1.6.4+):
- - Add the following 3rd party board manager under "File -> Preferences -> Additional Boards Manager URLs":
- http://arduino.esp8266.com/stable/package_esp8266com_index.json
- - Open the "Tools -> Board -> Board Manager" and click install for the ESP8266"
- - Select your ESP8266 in "Tools -> Board"
- */
- #include <ESP8266WiFi.h>
- #include <PubSubClient.h>
- #include <Arduino_JSON.h>
- // Update these with values suitable for your network.
- const char* ssid = "*******";
- const char* password = "*******";
- const char* mqtt_server = "jcckiot.com";
- const char* mqtt_username = "*******"; //为注册时填的邮箱
- const char* mqtt_password = "*******"; //为注册时填的密码
- WiFiClient espClient;
- PubSubClient client(espClient);
- unsigned long lastMsg = 0;
- #define MSG_BUFFER_SIZE (50)
- char msg[MSG_BUFFER_SIZE];
- int value = 0;
- uint8_t mac[6];
- char mac_string[32]; //该mac地址将作为clientid
- char report_status_topic[64];
- char control_device_topic[64];
- char device_disconnect_topic[64];
- void setup_wifi() {
- delay(10);
- // We start by connecting to a WiFi network
- Serial.println();
- Serial.print("Connecting to ");
- Serial.println(ssid);
- WiFi.mode(WIFI_STA);
- WiFi.begin(ssid, password);
- while (WiFi.status() != WL_CONNECTED) {
- delay(500);
- Serial.print(".");
- }
- randomSeed(micros());
- Serial.println("");
- Serial.println("WiFi connected");
- Serial.println("IP address: ");
- Serial.println(WiFi.localIP());
-
- }
- void set_topic()
- {
- WiFi.macAddress(mac);
- sprintf(mac_string, "%02X:%02X:%02X:%02X:%02X:%02X", mac[0], mac[1], mac[2], mac[3], mac[4], mac[5]);
- Serial.println("MAC address: ");
- Serial.println(mac_string);//将打印的mac地址在添加设备的时候填入
- Serial.println("mac地址将在添加设备的时候填入,请保存");
- Serial.println("");
- sprintf(report_status_topic, "/device/%s/status/%s", mqtt_username,mac_string);
- Serial.print("report_status_topic:");
- Serial.println(report_status_topic);
- sprintf(control_device_topic, "/device/%s/control/%s", mqtt_username,mac_string);
- Serial.print("control_device_topic:");
- Serial.println(control_device_topic);
- sprintf(device_disconnect_topic, "/device/%s/disconnect/%s", mqtt_username,mac_string);
- Serial.print("device_disconnect_topic:");
- Serial.println(device_disconnect_topic);
- }
- void callback(char* topic, byte* payload, unsigned int length) {
- Serial.print("Message arrived [");
- Serial.print(topic);
- Serial.print("] ");
- char msg[64]={0};
- for (int i = 0; i < length; i++) {
- msg[i] = (char)payload[i];
- }
-
- Serial.println(msg);
- JSONVar myObject = JSON.parse(msg);
- Serial.println((const char *)myObject["meteName"]);
- Serial.println(myObject["meteValue"]);
- // Switch on the LED if an 1 was received as first character
- if (!strcmp((const char *)myObject["meteName"],"switch1") && (int)myObject["meteValue"] == 1) {
- digitalWrite(BUILTIN_LED, LOW); // Turn the LED on (Note that LOW is the voltage level
- Serial.println("set led: low");
- client.publish(report_status_topic, "1");
- // but actually the LED is on; this is because
- // it is active low on the ESP-01)
- }
- if (!strcmp((const char *)myObject["meteName"],"switch1") && (int)myObject["meteValue"] == 0) {
- digitalWrite(BUILTIN_LED, HIGH); // Turn the LED off by making the voltage HIGH
- Serial.println("set led: HIGH");
- client.publish(report_status_topic, "0");
- }
- }
- void reconnect() {
- // Loop until we're reconnected
- while (!client.connected()) {
- Serial.println("Attempting MQTT connection...");
- // Create a random client ID
- String clientId = mac_string;
- Serial.print("MQTT clientId:");
- Serial.println(clientId);
- // Attempt to connect
- if (client.connect(clientId.c_str(),mqtt_username,mqtt_password,device_disconnect_topic,0,false,"0")) {
- Serial.println("connected");
- client.subscribe(control_device_topic);
- } else {
- Serial.print("failed, rc=");
- Serial.print(client.state());
- Serial.println(" try again in 5 seconds");
- // Wait 5 seconds before retrying
- delay(5000);
- }
- }
- }
- void setup() {
- pinMode(BUILTIN_LED, OUTPUT); // Initialize the BUILTIN_LED pin as an output
- Serial.begin(115200);
- setup_wifi();
- set_topic();
- client.setServer(mqtt_server, 1883);
- client.setCallback(callback);
- }
- void loop() {
- if (!client.connected()) {
- reconnect();
- }
- client.loop();
-
- }
最后,进入酱菜物联小程序添加设备,就可以实现远程控制了有什么问题可以到酱菜物联交流群(81728935)来一起交流


|
|