本帖最后由 OpenJumper 于 2022-1-17 15:17 编辑
[md]## 一、8 * 8LED点阵显示实验
在之前的课程中我们已经学习了一位数码管、四位数码管以及1602液晶显示器等三种显示工具的应用,接下来,我们要学习的就是另一种显示工具——8 * 8LED点阵的实验与应用。
## 二、实验器材
+ UNO控制板:1块
+ 220Ω电阻:8个
+ 8*8LED点阵:1块
+ 面包板:1块
+ 面包板跳线:若干
## 三、连线示意图
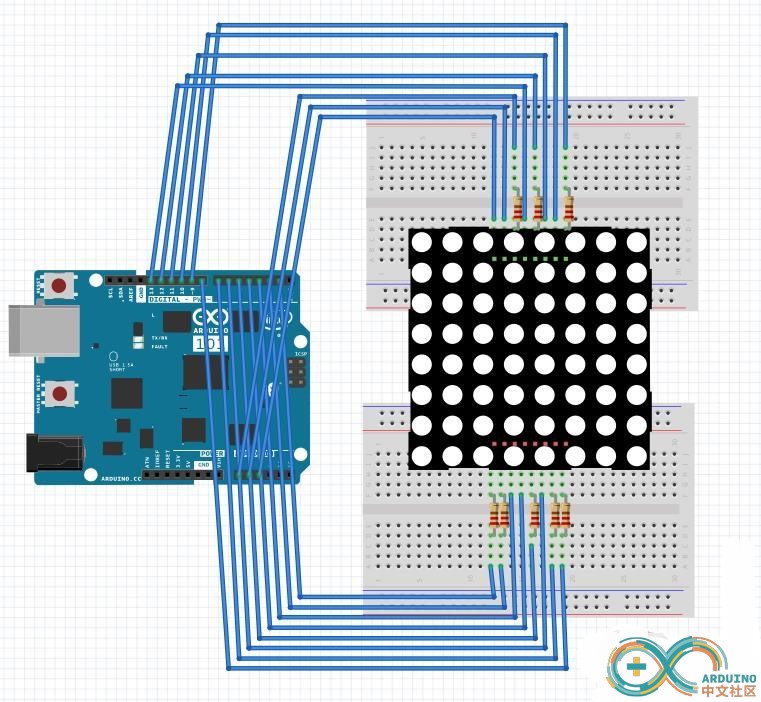
图9-1
## 四、硬件连接图
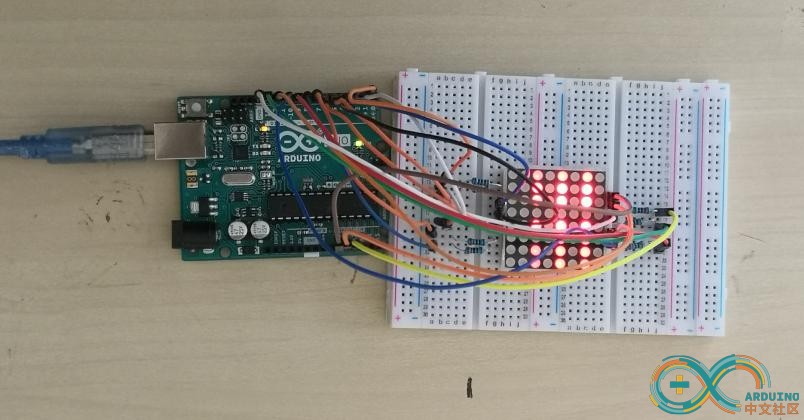
图9-2
## 五、硬件知识要点
点阵显示器原理图如下:
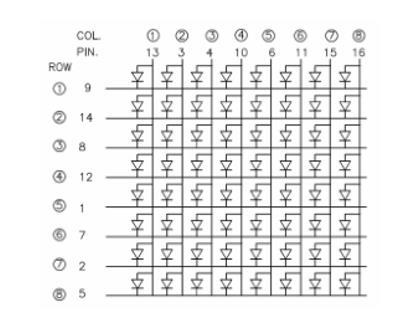
图9-3
从正面看,16个引脚的编号如下图,与原理图中的PIN是相互对应的。
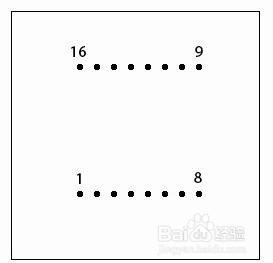
图9-4
我们需要在输入电流的引脚上串联220Ω的电阻起到限流的作用。
## 六、程序编写
代码部分:[/md]- //the pin to control ROW
- const int row1 = 2; // the number of the row pin 9
- const int row2 = 3; // the number of the row pin 14
- const int row3 = 4; // the number of the row pin 8
- const int row4 = 5; // the number of the row pin 12
- const int row5 = 6; // the number of the row pin 1
- const int row6 = 7; // the number of the row pin 7
- const int row7 = 8; // the number of the row pin 2
- const int row8 = 9; // the number of the row pin 5
- //the pin to control COl
- const int col1 = 10; // the number of the col pin 13
- const int col2 = 11; // the number of the col pin 3
- const int col3 = 12; // the number of the col pin 4
- const int col4 = 13; // the number of the col pin 10
- const int col5 = 14; // the number of the col pin 6
- const int col6 = 15; // the number of the col pin 11
- const int col7 = 16; // the number of the col pin 15
- const int col8 = 17; // the number of the col pin 16
- unsigned char Text[]={0x00,0x1c,0x22,0x22,0x22,0x22,0x22,0x1c};
- void Draw_point(unsigned char x,unsigned char y)
- {
- clear_();
- digitalWrite(x+2, HIGH);
- digitalWrite(y+10, LOW);
- delay(1);
- }
- void show_num(void)
- {
- unsigned char i,j,data;
- for(i=0;i<8;i++)
- {
- data=Text[i];
- for(j=0;j<8;j++)
- {
- if(data & 0x01)Draw_point(j,i);
- data>>=1;
- }
- }
- }
- void setup(){
- int i = 0 ;
- for(i=2;i<18;i++)
- {
- pinMode(i, OUTPUT);
- }
- clear_();
- }
- void loop()
- {
- show_num();
- }
- void clear_(void)
- {
- for(int i=2;i<10;i++)
- digitalWrite(i, LOW);
- for(int i=0;i<8;i++)
- digitalWrite(i+10, HIGH);
- }
## 七、程序知识要点
const关键字代表常量。它是一个变量限定符,用于修改变量的性质,使其变为只读状态。这意味着该变量,就像任何相同类型的其他变量一样使用,但不能改变其值。如果尝试为一个const变量赋值,编译时将会报错。
const关键字定义的常量,遵守 variable scoping 管辖的其他变量的规则。这一点加上使用 #define的缺陷 ,使 const 关键字成为定义常量的一个的首选方法。
例子[/md]
- const float pi = 3.14;
- float x;
-
- // ....
-
- x = pi * 2; // 在数学表达式中使用常量不会报错
-
- pi = 7; // 错误的用法 - 你不能修改常量值,或给常量赋值。
[md]
## 八、拓展阅读
在本章节的拓展阅读中,我们给大家带来一个用8*8LED点阵来显示汉字的例程,具体程序代码如下:
[/md]
- int R[] = {2,7,A5,5,13,A4,12,A2}; //行
- int C[] = {6,11,10,4,A3,3,8,9}; //列
- unsigned char zhu[8][8] = //祝
- {
- 1,0,0,1,1,1,1,1,
- 0,1,0,1,0,0,0,1,
- 1,1,1,1,1,1,1,1,
- 0,1,1,0,1,0,1,0,
- 1,1,0,0,1,0,1,0,
- 0,1,0,0,1,0,1,0,
- 0,1,0,0,1,0,1,0,
- 0,1,0,1,0,0,1,1,
- };
- unsigned char da[8][8] = //大
- {
- 0,0,0,1,0,0,0,0,
- 0,0,0,1,0,0,0,0,
- 1,1,1,1,1,1,1,1,
- 0,0,0,1,0,0,0,0,
- 0,0,0,1,0,0,0,0,
- 0,0,1,0,1,0,0,0,
- 0,1,0,0,0,1,0,0,
- 1,0,0,0,0,0,1,1,
- };
- unsigned char jia[8][8] = //家
- {
- 0,0,0,1,0,0,0,0,
- 1,1,1,1,1,1,1,1,
- 1,0,1,1,1,1,0,1,
- 0,0,1,1,0,0,1,0,
- 1,1,1,1,1,1,0,0,
- 0,1,1,1,1,0,0,0,
- 1,1,0,1,0,1,0,0,
- 0,0,1,1,0,0,1,1,
- };
- unsigned char jie[8][8] = //节
- {
- 0,0,1,0,0,1,0,0,
- 0,1,1,1,1,1,1,0,
- 0,0,1,0,0,1,0,0,
- 0,0,0,0,0,0,0,0,
- 0,1,1,1,1,1,1,0,
- 0,0,0,1,0,0,1,0,
- 0,0,0,1,0,1,1,0,
- 0,0,0,1,0,0,0,0,
- };
- unsigned char ri[8][8] = //日
- {
- 0,0,0,0,0,0,0,0,
- 0,1,1,1,1,1,1,0,
- 0,1,0,0,0,0,1,0,
- 0,1,1,1,1,1,1,0,
- 0,1,0,0,0,0,1,0,
- 0,1,0,0,0,0,1,0,
- 0,1,1,1,1,1,1,0,
- 0,0,0,0,0,0,0,0,
- };
- unsigned char kuai[8][8] = //快
- {
- 0,1,0,0,1,0,0,0,
- 0,1,0,0,1,0,0,0,
- 1,1,0,1,1,1,1,0,
- 0,1,1,0,1,0,1,0,
- 0,1,1,1,1,1,1,1,
- 0,1,0,0,1,0,0,0,
- 0,1,0,1,0,1,0,0,
- 0,1,1,0,0,0,1,1,
- };
- unsigned char le[8][8] = //乐
- {
- 0,0,0,0,0,0,0,1,
- 0,1,1,1,1,1,1,0,
- 0,1,0,0,1,0,0,0,
- 0,1,1,1,1,1,1,1,
- 0,0,0,0,1,0,0,0,
- 0,0,1,0,1,0,1,0,
- 0,1,0,0,1,0,0,1,
- 0,0,0,1,1,0,0,0,
- };
- unsigned char ximie[8][8] = //全部熄灭
- {
- 0,0,0,0,0,0,0,0,
- 0,0,0,0,0,0,0,0,
- 0,0,0,0,0,0,0,0,
- 0,0,0,0,0,0,0,0,
- 0,0,0,0,0,0,0,0,
- 0,0,0,0,0,0,0,0,
- 0,0,0,0,0,0,0,0,
- 0,0,0,0,0,0,0,0,
- };
- unsigned char biglove[8][8] = //大“心型”的数据
- {
- 0,0,0,0,0,0,0,0,
- 0,1,1,0,0,1,1,0,
- 1,1,1,1,1,1,1,1,
- 1,1,1,1,1,1,1,1,
- 1,1,1,1,1,1,1,1,
- 0,1,1,1,1,1,1,0,
- 0,0,1,1,1,1,0,0,
- 0,0,0,1,1,0,0,0,
- };
-
- unsigned char smalllove[8][8] = //小“心型”的数据
- {
- 0,0,0,0,0,0,0,0,
- 0,0,0,0,0,0,0,0,
- 0,0,1,0,0,1,0,0,
- 0,1,1,1,1,1,1,0,
- 0,1,1,1,1,1,1,0,
- 0,0,1,1,1,1,0,0,
- 0,0,0,1,1,0,0,0,
- 0,0,0,0,0,0,0,0,
- };
-
- void setup()
- {
- //循环定义行列PIN 为输出模式
- for(int i = 0;i<8;i++)
- {
- pinMode(R,OUTPUT);
- pinMode(C,OUTPUT);
- }
- }
-
- void loop()
- {
- BlessYou();
- }
-
- void Display(unsigned char dat[8][8]) //显示函数
- {
- for(int c = 0; c<8;c++)
- {
- digitalWrite(C[c],LOW);//选通第c列
-
- //循环
- for(int r = 0;r<8;r++)
- {
- digitalWrite(R[r],dat[r][c]);
- }
- delay(1);
- Clear(); //清空显示去除余晖
- }
- }
-
- void Clear() //清空显示
- {
- for(int i = 0;i<8;i++)
- {
- digitalWrite(R,LOW);
- digitalWrite(C,HIGH);
- }
- }
- void BlessYou()
- {
- for(int i = 0 ; i < 50 ; i++) //循环显示50次
- {
- Display(zhu); //显示 祝
- }
- for(int i = 0 ; i < 50 ; i++) //循环显示50次
- {
- Display(da); //显示 大
- }
- for(int i = 0 ; i < 50 ; i++) //循环显示50次
- {
- Display(jia); //显示 家
- }
- for(int i = 0 ; i< 50 ; i++) //循环显示50次
- {
- Display(jie); //显示 节
- }
- for(int i = 0 ; i<50 ; i++) //循环显示50次
- {
- Display(ri); //显示 日
- }
- for(int i = 0 ; i<50 ; i++) //循环显示50次
- {
- Display(kuai); //显示 快
- }
- for(int i = 0 ; i<50 ; i++) //循环显示50次
- {
- Display(le); //显示 乐
- }
- for(int i = 0 ; i<30 ; i++) //循环显示30次
- {
- Display(biglove); //显示 大心
- }
- for(int i = 0 ; i<30 ; i++) //循环显示30次
- {
- Display(smalllove); //显示 小心
- }
- for(int i = 0 ; i<30 ; i++) //循环显示30次
- {
- Display(biglove); //显示 大心
- }
- for(int i = 0 ; i<30 ; i++) //循环显示30次
- {
- Display(smalllove); //显示 小心
- }
- for(int i = 0 ; i<200 ; i++) //循环显示200次
- {
- Display(ximie); //显示 熄灭200次
- }
- }
[md]
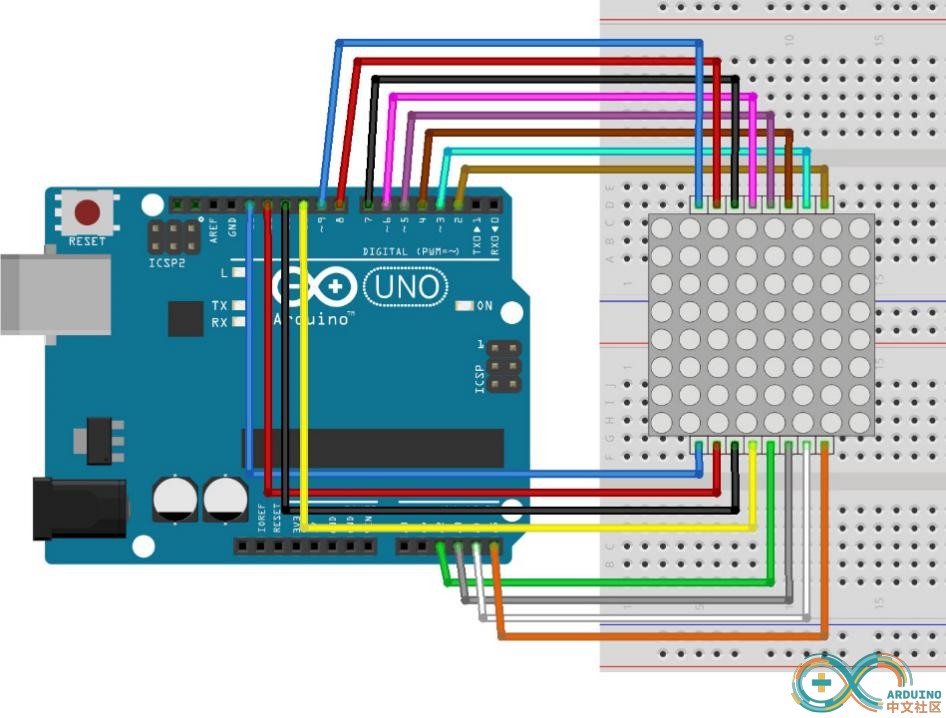
接线图如下:
以上程序在写入UNO控制板以后,大家可以看到点阵循环显示[/md] |