|
|
本帖最后由 topdog 于 2022-8-25 00:51 编辑
合宙ESP32C3使用TFT_eSPI库操作Eink 1.54寸屏幕。主要介绍实现示例TFT_eSPI\examples\ePaper\Floyd_Steinberg的步骤:
1,涉及TFT_eSPI和EPD_Libraries库:
SPI接口和引脚在EPD库中定义,TFT_eSPI库仅提供图形功能。
https://github.com/Bodmer/TFT_eSPI
https://github.com/Bodmer/EPD_Libraries/
2,接线:
[pre]Eink ESP32C3
GND GND
VCC 3.3V
SCL GPIO2
SDA GPIO3
RES GPIO10
DC GPIO6
CS GPIO7
BUSY GPIO8[/pre]
3,对TFT_eSPI库的修改
[pre]\Arduino\libraries\TFT_eSPI\User_Setup_Select.h
第22行注释掉
//#include <User_Setup.h> // Default setup is root library folder
第41行启用
#include <User_Setups/Setup17_ePaper.h> // Setup file for ESP8266 and any Waveshare ePaper display[/pre]
4,对EPD_Libraries库的修改
[pre]EPD_Libraries\epd1in54\epdif.h第40行至43行修改为:
// Display GPIO esp32c3 pin
#define BUSY_PIN 8
#define RST_PIN 10
#define DC_PIN 6
#define CS_PIN 7[/pre]
然后将EPD_Libraries之下epd1in54文件夹复制黏贴到\Arduino\libraries\文件夹里面。
5,程序如下:
[pre]#include <epd1in54.h> // Screen specific library
Epd ePaper; // Create an instance ePaper
#include <TFT_eSPI.h> // Graphics library and Sprite class
TFT_eSPI glc = TFT_eSPI(); // Invoke the graphics library class
TFT_eSprite frame = TFT_eSprite(&glc); // Invoke the Sprite class for the image frame buffer
#define INK COLORED // Black ink
#define PAPER UNCOLORED // 'paper' background colour
uint16_t epd_width = EPD_WIDTH; // Set the initial values, these are swapped
uint16_t epd_height = EPD_HEIGHT; // in different landscape/portrait rotations
// so call frame.width() or frame.height() to get new values
#define EPD_BUFFER 1 // Label for the black frame buffer 1
uint8_t* framePtr = NULL; // Pointer for the black frame buffer
uint8_t* redFramePtr = NULL; // Pointer for the red frame buffer
#include "EPD_Support.h" // Include sketch EPD support functions last!
int8_t limit = 5; // Limit the number of loops before halting
//------------------------------------------------------------------------------------
// Setup
//------------------------------------------------------------------------------------
void setup() {
SPI.begin( 2, -1, 3, 7); // SPI.begin( SCL(CLK,) MISO, SDA(MOSI,) CS);
Serial.begin(250000); // Used for messages
// Initialise the ePaper library
if (ePaper.Init() != 0) {
Serial.print("ePaper init failed");
while (1) yield(); // Wait here until re-boot
}
Serial.println("\r\n ePaper initialisation OK");
// Initialise the SPIFFS filing system
if (!SPIFFS.begin()) {
Serial.println("SPIFFS initialisation failed!");
while (1) yield(); // Stay here twiddling thumbs
}
Serial.println(" SPIFFS initialisation OK");
frame.setColorDepth(1); // Must set the bits per pixel to 1 for ePaper displays
// Set bit depth BEFORE creating Sprite, default is 16!
// Create a frame buffer in RAM of defined size and save the pointer to it
// RAM needed is about (EPD_WIDTH * EPD_HEIGHT)/8 , ~5000 bytes for 200 x 200 pixels
// Note: always create the Sprite before setting the Sprite rotation
framePtr = (uint8_t*) frame.createSprite(EPD_WIDTH, EPD_HEIGHT, 2); // Create sprite with 2 frame buffers
redFramePtr = (uint8_t*) frame.frameBuffer(2); // Pointer to frame buffer 2
// Clear the two frame buffers
frame.frameBuffer(1);
frame.fillSprite(PAPER);
frame.frameBuffer(2);
frame.fillSprite(PAPER);
Serial.println("\r\nInitialisation done.");
listFiles(); // List all the files in the SPIFFS
}
//------------------------------------------------------------------------------------
// Loop
//------------------------------------------------------------------------------------
void loop() {
// Select frame buffer 1 for the graphics
frame.frameBuffer(2); // Select red frame
frame.fillSprite(PAPER); // Fill frame with white
frame.frameBuffer(1); // Select black frame
frame.fillSprite(PAPER); // Fill frame with white
frame.setRotation(random(4)); // Set the rotation to 0, 1, 2 or 3 ( 1 & 3 = landscape)
// Draw 8 bit grey-scale bitmap using Floyd-Steinberg dithering at x,y
// /File name x y
//drawFSBmp("/TestCard.bmp", 0, 0); // 176 x 264 pixels
drawFSBmp("/Tiger.bmp", (frame.width()-176)/2, (frame.height()-234)/2); // 176 x 234 pixels
updateDisplay(); // Send image to display and refresh
delay(10000);
frame.fillSprite(PAPER); // Fill frame with white
// Draw circle in frame buffer (x, y, r, color) in center of screen
frame.drawCircle(frame.width()/2, frame.height()/2, frame.width()/5, INK);
// Draw diagonal lines
frame.drawLine(0 , 0, frame.width()-1, frame.height()-1, INK);
frame.drawLine(0 , frame.height()-1, frame.width()-1, 0, INK);
frame.fillCircle(frame.width()/2, frame.height()/2, frame.width()/6, PAPER); // Clear black area for red circle
frame.frameBuffer(2);
frame.fillCircle(frame.width()/2, frame.height()/2, frame.width()/6, INK); // Draw red circle
updateDisplay(); // Send image to display and refresh
delay(10000);
// Run a rotation test
rotateTest();
delay(10000);
// Put screen to sleep to save power (if wanted)
ePaper.Sleep();
if (--limit <= 0) while(1) yield(); // Wait here
delay(20000); // Wait here for 20s
// Wake up ePaper display so we can talk to it
Serial.println("Waking up!");
ePaper.Init(INIT_LUT);
} // end of loop()
//------------------------------------------------------------------------------------
// setRotation() actually rotates the drawing coordinates, not the whole display frame
// buffer so we can use this to draw text at right angles or upside down
//------------------------------------------------------------------------------------
void rotateTest(void)
{
//frame.fillSprite(PAPER); // Fill buffer with white to clear old graphics
// Draw some text in frame buffer
frame.frameBuffer(1);
frame.setTextFont(4); // Select font 4
frame.setTextColor(INK); // Set colour to ink
frame.setTextDatum(TC_DATUM); // Middle centre text datum
frame.setRotation(0); // Set the display rotation to 0, 1, 2 or 3 ( 1 & 3 = landscape)
epd_width = frame.width(); // Get the values for the current rotation
epd_height = frame.height(); // epd_height is not used in this sketch
frame.drawString("Rotation 0", epd_width / 2, 10);
frame.setRotation(1); // Set the display rotation to 1
epd_width = frame.width(); // Get the values for the current rotation
epd_height = frame.height(); // epd_height is not used in this sketch
frame.drawString("Rotation 1", epd_width / 2, 10);
frame.setRotation(2); // Set the display rotation to 2
epd_width = frame.width(); // Get the values for the current rotation
epd_height = frame.height(); // epd_height is not used in this sketch
frame.drawString("Rotation 2", epd_width / 2, 10);
frame.setRotation(3); // Set the display rotation to 3
epd_width = frame.width(); // Get the values for the current rotation
epd_height = frame.height(); // epd_height is not used in this sketch
frame.drawString("Rotation 3", epd_width / 2, 10);
Serial.println("Updating display");
updateDisplay(); // Update display
}[/pre]
6,这个示例需要使用SPIFFS,全称为:SPI Flash Filing System 她的作用就是利用闪存存储代码甚至是文件。在此简单介绍一下流程:
(1)示例程序的文件结构,其中要上传到闪存里去的文件在data文件夹里面

(2)上传使用的工具位于Arduino\tools\里面

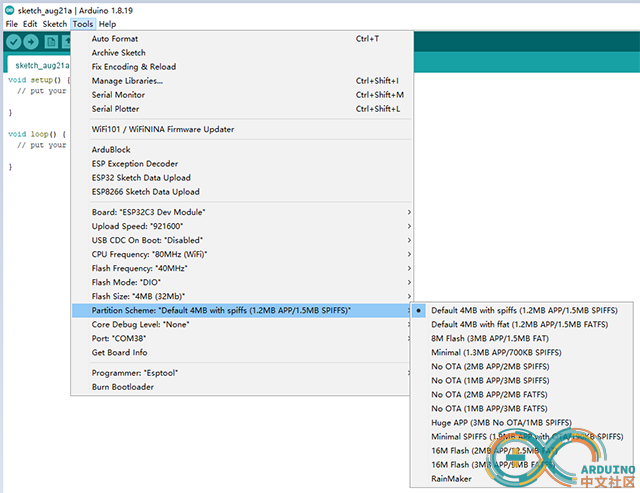
(3) 编译之前,先要选择高亮位置对闪存预定的分配进行分区,然后点击tool-->ESP32 Sketch Data Upload操作

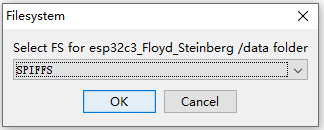
(4) 之前最好全片擦除一下,再把data文件夹里面的老虎图片spiffs格式上传到闪存上去。

点击OK以后,老虎图片就会传到闪存里。
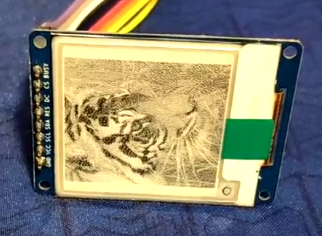
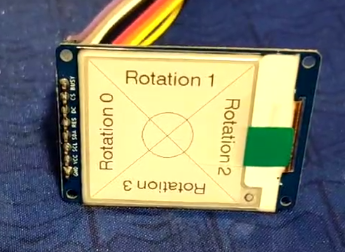
7,有图有真相:
第一画面

第二画面

|
|