|
|
本帖最后由 沧海笑1122 于 2017-5-30 22:07 编辑
【麦步手表+FireBeetle Board-ESP32】控制LED灯
这不是一篇水帖,其实在此之前,我是先用esp32进行了测试,并且希望直接驱动小车,可惜在测试过程中,发生cpu崩溃。说明我对esp32的学习了解还不够。但是,同样的原理驱动led是没有问题的。所以这篇小文是一个桥梁,希望详细了解控制原理的玩家,请参考原贴。
基本思路:在esp32上建立一个基于wifi的简单的http server,通过esp32(wifi)--路由器---手机---(BLE)---maibu手表,将手表按键的控制参数传至esp32,从而控制led灯。
直接上代码吧:[kenrobot_code]/*
WiFi Web Server LED Blink
A simple web server that lets you blink an LED via the web.
This sketch will print the IP address of your WiFi Shield (once connected)
to the Serial monitor. From there, you can open that address in a web browser
to turn on and off the LED on pin 5.
If the IP address of your shield is yourAddress:
http://yourAddress/H turns the LED on
http://yourAddress/L turns it off
This example is written for a network using WPA encryption. For
WEP or WPA, change the Wifi.begin() call accordingly.
Circuit:
* WiFi shield attached
* LED attached to pin 5
created for arduino 25 Nov 2012
by Tom Igoe
ported for sparkfun esp32
31.01.2017 by Jan Hendrik Berlin
根据此示例改编了小车控制程序。
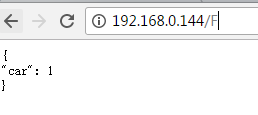
date:2017-05-20http://192.168.0.144/F led--d2(gpio25)
http://192.168.0.144/B led--d3(gpio26)
http://192.168.0.144/S led--d4(gpio27)
*/
#include <WiFi.h>
const char* ssid = "your ssid";
const char* password = "your psw";
WiFiServer server(80);
void setup()
{
Serial.begin(115200);
delay(10);
// We start by connecting to a WiFi network
Serial.println();
Serial.println();
Serial.print("Connecting to ");
Serial.println(ssid);
delay(10);
WiFi.begin(ssid, password);
while (WiFi.status() != WL_CONNECTED) {
delay(500);
Serial.print(".");
}
Serial.println("");
Serial.println("WiFi connected");
Serial.println("IP address: ");
Serial.println(WiFi.localIP());
server.begin();
pinMode(D2, OUTPUT); // led红,
pinMode(D3, OUTPUT); // led绿,
pinMode(D4, OUTPUT); // led蓝,
}
//int value = 0;
void loop(){
int carzt=0;
WiFiClient client = server.available(); // listen for incoming clients
if (client) { // if you get a client,
Serial.println("new client"); // print a message out the serial port
String currentLine = ""; // make a String to hold incoming data from the client
while (client.connected()) { // loop while the client's connected
if (client.available()) { // if there's bytes to read from the client,
char c = client.read(); // read a byte, then
Serial.write(c); // print it out the serial monitor
if (c == '\n') { // if the byte is a newline character
// if the current line is blank, you got two newline characters in a row.
// that's the end of the client HTTP request, so send a response:
if (currentLine.length() == 0) {
// HTTP headers always start with a response code (e.g. HTTP/1.1 200 OK)
// and a content-type so the client knows what's coming, then a blank line:
client.println("HTTP/1.1 200 OK");
client.println("Content-Type: application/json");
client.println();
client.println("{");
client.print("\"car");
client.print("\": ");
client.print(carzt);
client.println("\n}");
break;
} else { // if you got a newline, then clear currentLine:
currentLine = "";
}
} else if (c != '\r') { // if you got anything else but a carriage return character,
currentLine += c; // add it to the end of the currentLine
}
// Check to see if the client request was "GET /F" 、 "GET /B"or"GET /S"
if (currentLine.endsWith("GET /F")) {
digitalWrite(25, HIGH); // 点亮
delay(1000);
digitalWrite(25, LOW); // 熄灭
carzt=1;
}
if (currentLine.endsWith("GET /B")) {
digitalWrite(26, HIGH); // 点亮
delay(1000);
digitalWrite(26, LOW); // 熄灭
carzt=2;
}
if (currentLine.endsWith("GET /S")) {
digitalWrite(27, HIGH); // 点亮
delay(1000);
digitalWrite(27, LOW); // 熄灭
carzt=0;
}
}
}
// close the connection:
client.stop();
Serial.println("client disonnected");
}
}
[/kenrobot_code]
【感谢】
感谢dfrobot,感谢arduino.cn。这段时间沧海在社区参与了多个产品的评测,结识了很多优秀的玩家,感谢大家对我的支持和关注。我也向社区、向大家学习了很多东西。
祝社区越办越好,祝dfrobot事业蒸蒸日上。
沧海抱拳!端午安康。。
|
-

|
