|
|
本帖最后由 topdog 于 2022-8-28 20:07 编辑
深圳晶彩智能3.5寸彩色屏采用分辨率480x320彩色液晶屏,驱动芯片是ST7796。本回主要介绍在闪存上存储照片然后在屏幕上播放。涉及到TJpg_Decoder 和TFT_eSPI库。《PlatformIO IDE使用TFT_eSPI库开发深圳晶彩智能2.8寸彩色屏》已经讲了修改TFT_eSPI\User_Setup.h完成配置的方法,也可以利用PlatformIO的一个优点,即在项目设置中指定条件编译的定义。因此,现在可以在项目的配置文件 platformio.ini 中对使用的显示器和引脚布线进行设置,而不是按照 Arduino 的要求修改库本身的源代码文件。此处的位置是文件 [env] 部分中build_flags指令。为了使TFT库知道我们的显示设置现在通过项目设置“从外部”进行,在任何情况下都必须设置标志USER_SETUP_LOADED = 1。然后,您接管了相应的自己的显示设置的所有定义指令,否则您将在库的文件User_Setup.h中指定这些指令。定义指令用生成标志 -D 标记。
深圳晶彩智能3.5寸彩色屏对应的platformio.ini 修改成:
[pre][env:esp32dev]
platform = espressif32
board = esp32dev
framework = arduino
upload_speed = 921600
board_build.f_flash = 80000000L
board_build.flash_mode = qio
monitor_speed = 115200
upload_port = COM9
; change microcontroller
board_build.mcu = esp32
upload_protocol = esptool
; change MCU frequency
board_build.f_cpu = 240000000L
lib_ldf_mode = deep
board_build.partitions = huge_app.csv
board_build.filesystem = littlefs
platform_packages =
platformio/framework-arduinoespressif32@^3.20004.0
build_flags = -DCORE_DEBUG_LEVEL=3
-DBOARD_HAS_PSRAM
-mfix-esp32-psram-cache-issue
-DUSER_SETUP_LOADED=1
-DDEBUG=1
-DST7796_DRIVER=1
-DTFT_RGB_ORDER=TFT_BGR
-DTFT_WIDTH=320
-DTFT_HEIGHT=480
-DTFT_BACKLIGHT_ON=HIGH
-DTFT_BACKLIGHT_OFF=LOW
-DTFT_MISO=12
-DTFT_MOSI=13
-DTFT_SCLK=14
-DTFT_CS=15
-DTFT_DC=2
-DTFT_RST=-1
-DTFT_BL=27
-DTOUCH_CS=33
-DLOAD_GLCD=1
-DLOAD_FONT2=1
-DLOAD_FONT4=1
-DLOAD_FONT6=1
-DLOAD_FONT7=1
-DLOAD_FONT8=1
-DLOAD_GFXFF=1
-DSMOOTH_FONT=1
-DSPI_FREQUENCY=65000000
-DSPI_READ_FREQUENCY=20000000
-DSPI_TOUCH_FREQUENCY=2500000
-DUSE_HSPI_PORT=1
lib_deps =
bodmer/TFT_eSPI@^2.4.75[/pre]
移植的示例是\libraries\TJpg_Decoder\examples\LittleFS\All_LittleFS,乐鑫官方也准备弃用SPIFFS,那么未雨绸缪,逐渐熟悉使用LittleFS文件管理系统。此案例中 就是 board_build.filesystem = littlefs 来设置文件管理系统,如果用 ; (英文符号)写在最左面,就是注释掉了,采用SPIFFS。
1,pio home 创建项目TJpg_Decoder_JCZN
2,pio home 安装 TFT_eSPI
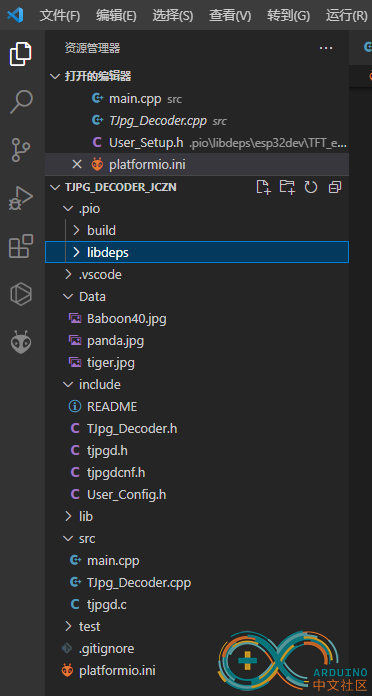
3,pio home 安装TJpg_Decoder 库编译时没有通过,只能手动安装。https://github.com/Bodmer/TJpg_Decoder ,下载1.0.5版本。然后把src中的*.h文件全部放到\PlatformIO\Projects\TJpg_Decoder_JCZN\include文件夹里面,*.cpp和*.c文件放到\PlatformIO\Projects\TJpg_Decoder_JCZN\src文件夹。
全部文件结构如下:

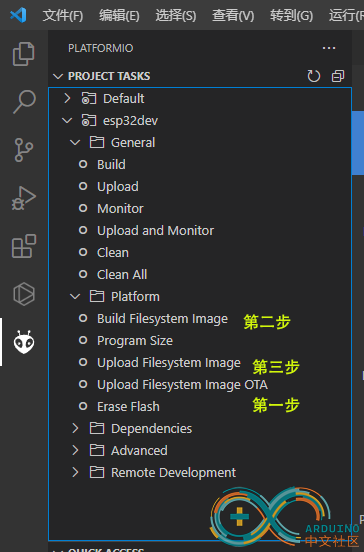
4,把装有照片的data文件夹按照\PlatformIO\Projects\TJpg_Decoder_JCZN\路径放置,然后点击下列图片所示第一步全片擦除,第二步编译图片,第三步上传到闪存进行操作。

5,main.cpp输入以下程序:
[pre]#include <Arduino.h>
#include <TJpg_Decoder.h>
// Include LittleFS
#include <FS.h>
#include "LittleFS.h" // ESP32 only
// Include the TFT library https://github.com/Bodmer/TFT_eSPI
#include "SPI.h"
#include <TFT_eSPI.h> // Hardware-specific library
TFT_eSPI tft = TFT_eSPI(); // Invoke custom library
// Support funtion prototypes
bool tft_output(int16_t x, int16_t y, uint16_t w, uint16_t h, uint16_t* bitmap);
void loadFile(const char *name);
//====================================================================================
// Setup
//====================================================================================
void setup()
{
Serial.begin(115200);
Serial.println("\n\n Testing TJpg_Decoder library");
// Initialise LittleFS
if (!LittleFS.begin()) {
Serial.println("LittleFS initialisation failed!");
while (1) yield(); // Stay here twiddling thumbs waiting
}
Serial.println("\r\nInitialisation done.");
// Initialise the TFT
tft.begin();
tft.setTextColor(0xFFFF, 0x0000);
tft.fillScreen(TFT_BLACK);
// The jpeg image can be scaled by a factor of 1, 2, 4, or 8
TJpgDec.setJpgScale(1);
// The byte order can be swapped (set true for TFT_eSPI)
TJpgDec.setSwapBytes(true);
// The decoder must be given the exact name of the rendering function above
TJpgDec.setCallback(tft_output);
}
//====================================================================================
// Loop
//====================================================================================
void loop()
{
File root = LittleFS.open("/", "r");
while (File file = root.openNextFile()) {
String strname = file.name();
strname = "/" + strname;
Serial.println(file.name());
// If it is not a directory and filename ends in .jpg then load it
if (!file.isDirectory() && strname.endsWith(".jpg")) {
loadFile(strname.c_str());
}
}
}
//====================================================================================
// tft_output
//====================================================================================
// This next function will be called during decoding of the jpeg file to
// render each block to the TFT. If you use a different TFT library
// you will need to adapt this function to suit.
bool tft_output(int16_t x, int16_t y, uint16_t w, uint16_t h, uint16_t* bitmap)
{
// Stop further decoding as image is running off bottom of screen
if ( y >= tft.height() ) return 0;
// This function will clip the image block rendering automatically at the TFT boundaries
tft.pushImage(x, y, w, h, bitmap);
// This might work instead if you adapt the sketch to use the Adafruit_GFX library
// tft.drawRGBBitmap(x, y, bitmap, w, h);
// Return 1 to decode next block
return 1;
}
//====================================================================================
// load_file
//====================================================================================
void loadFile(const char *name)
{
tft.fillScreen(TFT_RED);
// Time recorded for test purposes
uint32_t t = millis();
// Get the width and height in pixels of the jpeg if you wish
uint16_t w = 0, h = 0, scale;
TJpgDec.getFsJpgSize(&w, &h, name, LittleFS); // Note name preceded with "/"
tft.setRotation(w > h ? 1 : 0);
for (scale = 1; scale <= 8; scale <<= 1) {
if (w <= tft.width() * scale && h <= tft.height() * scale) break;
}
TJpgDec.setJpgScale(scale);
// Draw the image, top left at 0,0
TJpgDec.drawFsJpg(0, 0, name, LittleFS);
// How much time did rendering take
t = millis() - t;
char buf[80];
sprintf(buf, "%s %dx%d 1:%d %u ms", name, w, h, scale, t);
tft.setCursor(0, tft.height() - 8);
tft.print(buf);
Serial.println(buf);
delay(2000);
}[/pre]
编译速度飞快吧!

|
|