本帖最后由 沧海笑1122 于 2021-5-12 18:23 编辑
基于M5Stack的两种玩法的HX711厨房电子秤
【背景故事】 电子秤我前后做过6个版本: 第一版是2014年完成的,基于arduinonano+LCD 5110+hx711,这一版也是一个实用器,使用了将近五六年,主要是用作厨房秤,这些年烘培出无数美味面包,这一版电子秤功不可没。 第二版是基于m5stack basic+hx711,因此还写过一个帖子《129行代码的M5Stack(coreEsp32)电子秤(micropython)》。 第三版是基于M5StickC+Unit(HX711)电子秤,用UIFlow写的,全部代码只有25行,得益于UIFlow对hx711的良好封装。 第四版就是在第三版基础上,使用app inventor 2.0写了一个手机APP,通过手机ble与m5atom的ble进行通信,将称重数据上送至手机APP,从而实现一个手机电子秤。 第五版就是使用blynk+m5stickc,实现的基于物联网的电子秤,也是在手机上显示电子秤称重结果,但使用的技术有所不同。 第六版是基于raspberry pico+LCD1602实现的,基本上是一个原型搭建,会在专门的帖子里介绍,本文不展开。 今天的文章重点写第4、5版,他们的共同点是使用一个通用的秤盘,他们的不同点就是分别使用了esp32,esp32+手机,esp32+blynk(当然也离不开一部手机)来实现一个带有去皮功能的厨房秤。 主要知识点包括uiflow使用、esp32与手机ble通信、blynk编程。就实用而言,第三版已经足矣,而趣味性则各有千秋。
【一、软硬件准备】 | 电子秤版本 | | | | | V4 | M5stackAtom(esp32)+ Unit(HX711)+安卓手机 | App Inventor 2.0(手机APP) Arduino IDE 1.8.13 | | | V5 | M5StickC(esp32)+ Unit(HX711)+安卓手机 | Blynk (手机app) UIFLOW 1.7.6 | |
备注: 这是一个计重 Unit。集成专为高精度电子秤而设计的24位A/D转换器芯片HX711。输入选择开关可任意选取通道A 或通道B,与其内部的低噪声可编程放大器(PGA)相连.通道A 的可编程增益为128 或64,对应的满额度差分输入信号幅值分别为±20mV或±40mV.通道B 则为固定的32 增益,所有控制信号由管脚驱动,无需对芯片内部的寄存器编程。 2、秤盘+形变传感器 (1)形变传感器:形变传感器,顾名思义根据物体重量不同,称重时作用于两个支点的形变传感器,从而产生物理形变,发出电信号,经过A/D转换后提供给单片机进行处理、展示。形变传感器来自网购。请注意量程,我用于厨房秤用途,所以选用1000g。 (2)秤盘:小盒一只,乐高积木两片,热熔胶枪一把。 首先我们看一下工作情况:
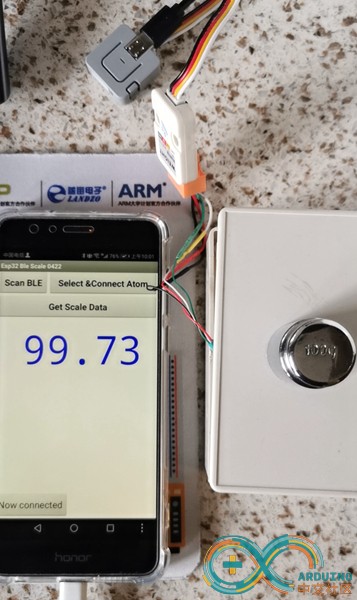
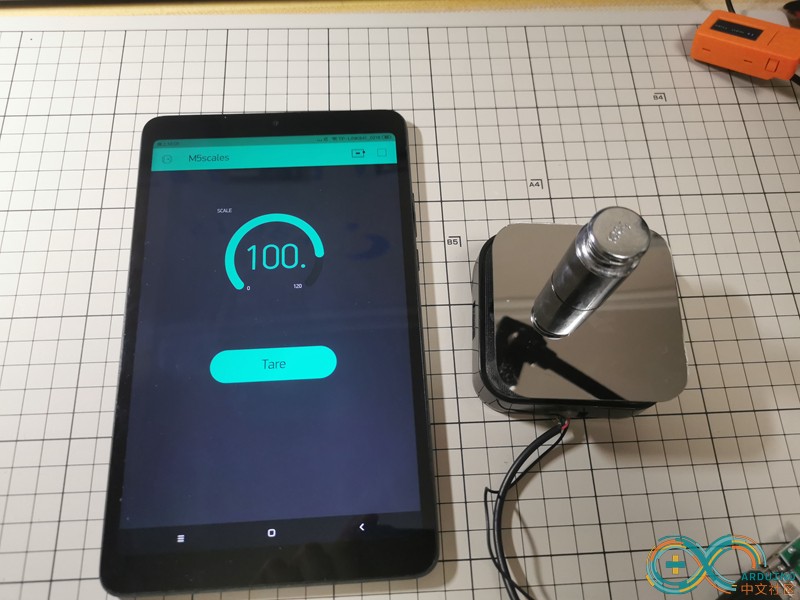
注:v5用的秤盘是第一版使用的秤盘,原理完全一致,外形有所不同。 【二、秤盘+形变传感器制作过程】 详见我以前的帖子:
(1)使用100g砝码一只,观察称重数据为-829;200g砝码一只,观察称重数据为-1660,因此得到称重折算系数为:-1660/200=-829/100=8.3 每个形变传感器的参数略有不同,所以用砝码校正折算系数是必要的。 (2)联调后,顺利得到正确称重数据。 形变传感器接unit时,需要把引线重新焊一下,并且热缩处理。
【四、原理框图】 1、V4 M5StickC+BLE+手机APP(ai2)电子秤(以下简称V5电子秤) (1)app inventor 2.0部分
这是电子秤APP的UI部分: | 序号 | | | | 1 | |
| | 2 | Select&connect Atom:在设备列表中,选择并且连接标记为M5stackAtom的BLE设备(M5Atom esp32 core) | 选择连接后,标记为4的按钮会显示:Now Connected | | 3 | Get scale Data: 触发一个定时器,每隔1秒读取一次Atom送来的称重数据 |
| | 4 | | | | 5 | | |
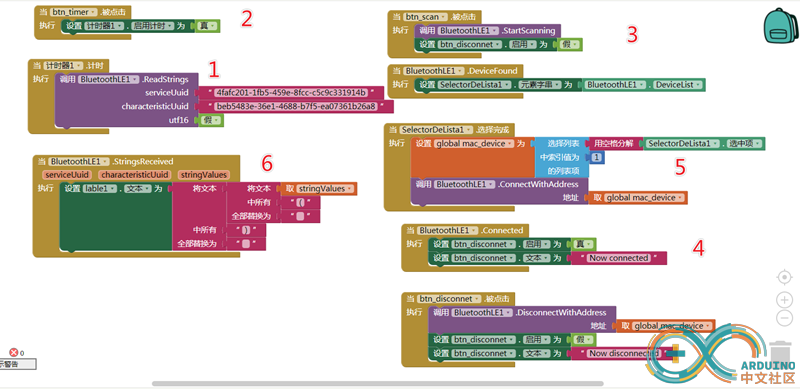
这是逻辑设计部分,也都比较直观: | 序号 | | | | 1 | 触发计时器后的动作,调用一个readstrings事件,读取相应的seriveUuid和characteristicUuid的数据 |
| | 2 | 这就是UI中get scale data按钮对应的逻辑,触发一个计数器 |
| | 3 | Scan ble被点击后,调用的搜索ble设备功能,同时对连接按钮的属性进行赋值 |
| | 4 | Ble连接建立后,连接按钮会显示:Now Connected |
| | 5 | 选择周边ble设备的功能,选中后,会传递mac_device地址 |
| | 6 | 这是一个收取ble数据的事件,将读到的stringvalues数据赋值给label的文本,够直观吧,令人想到了uiflow这样的做法。 | 由于读到的是一个列表,所以数据会带一对括号,简单用一个文本替换做处理。也许你会有更好的办法,我是懒了一下 |
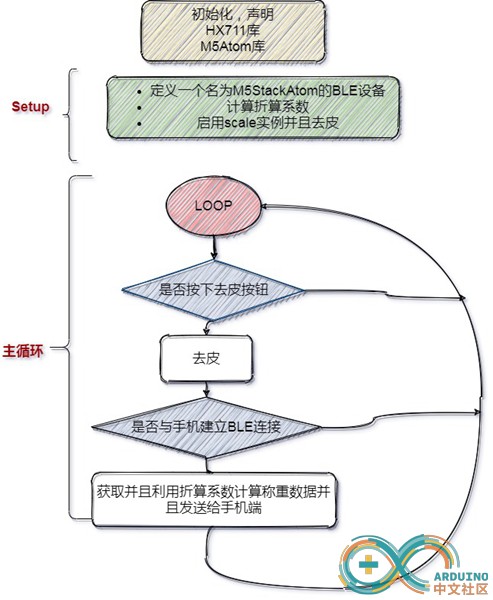
(2)我们来看一下arduino侧的做法(M5Atom esp32)
2、V5 M5StickC+blynk(手机物联网APP)电子秤(以下简称V5电子秤) (1)M5StickC部分,我们仍然使用uiflow
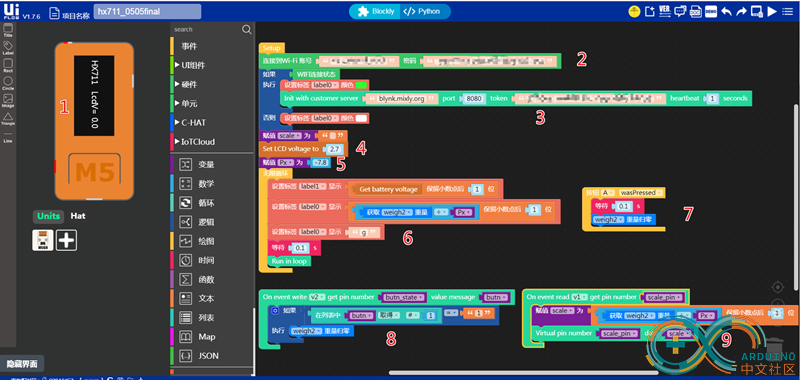
| 序号 | | | | 1 | UI设计,由于我们不需要在C上显示,仅仅是一个参考,所以留一个称重数据即可 | | | 2 | |
| | 3 | 检查连接wifi状态,并且连接blynk server,需要输入你从blynk获取的该项目的令牌 | 我们使用裘师兄提供的mixly的服务器,20万能量值 | | 4 | |
| | 5 | |
| | 6 | | | | 7 | | | | 8 | 这是一个blynk write去皮按钮的回调函数,在手机app上触发去皮按钮,会把状态传送给v2(虚拟pin2),从而实现去皮 | | | 9 | 这是一个blynk的read函数,以v1(虚拟pin1)向blynk server传送称重数据,将在手机app上进行读取、显示 |
|
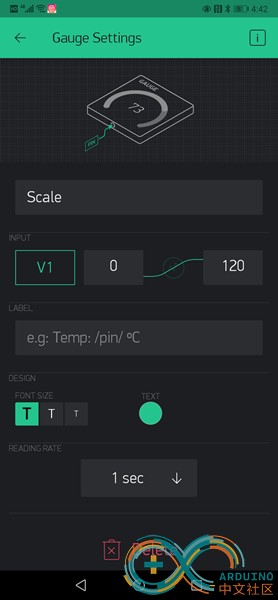
(2)blynk部分
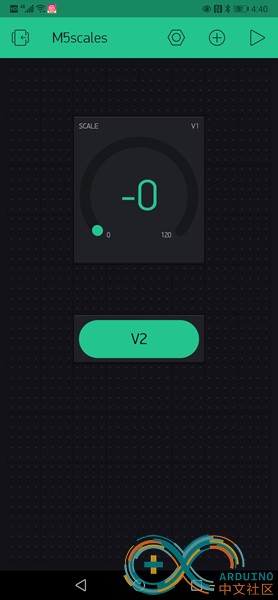
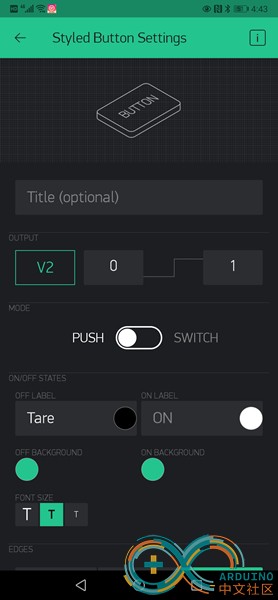
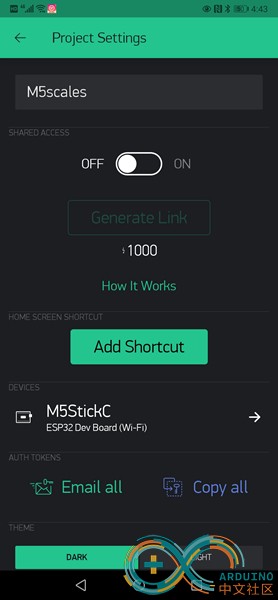
Blynk侧就两个组件,一个是用仪表盘显示称重数据,定义为v1(数据获取方式设为1秒获取一次;,第二个就是去皮按钮(定义为v2);开发板选用esp32 wifi连接方式。
【五、代码】 1、V4电子秤代码(atom侧,arduino)
- /*
- 2021-04-24
- IT works
- */
- // BLE init
- #include <BLEDevice.h>
- #include <BLEServer.h>
- #include <BLEUtils.h>
- #include <BLE2902.h>
- BLEServer* pServer = NULL;
- BLECharacteristic* pCharacteristic = NULL;
- bool deviceConnected = false;
- bool oldDeviceConnected = false;
- // See the following for generating UUIDs:
- // https://www.uuidgenerator.net/
- #define SERVICE_UUID "4fafc201-1fb5-459e-8fcc-c5c9c331914b"
- #define CHARACTERISTIC_UUID "beb5483e-36e1-4688-b7f5-ea07361b26a8"
- // HX711 INIT
- #include "HX711.h"
- // HX711 circuit wiring
- const int LOADCELL_DOUT_PIN = 32; //hx711接线
- const int LOADCELL_SCK_PIN = 26; //hx711接线
- HX711 scale;
- //uint32_t value = 0;
- float v_scale=0; //float type in hx711.cpp
- #include "M5Atom.h"
- //闪动效果,在发送数据时,闪动一下全彩led
- uint8_t DisBuff[2 + 5 * 5 * 3];
- void setBuff(uint8_t Rdata, uint8_t Gdata, uint8_t Bdata)
- {
- DisBuff[0] = 0x05;
- DisBuff[1] = 0x05;
- for (int i = 0; i < 25; i++)
- {
- DisBuff[2 + i * 3 + 0] = Rdata;
- DisBuff[2 + i * 3 + 1] = Gdata;
- DisBuff[2 + i * 3 + 2] = Bdata;
- }
- }
- class MyServerCallbacks: public BLEServerCallbacks {
- void onConnect(BLEServer* pServer) {
- deviceConnected = true;
- };
- void onDisconnect(BLEServer* pServer) {
- deviceConnected = false;
- }
- };
- void setup() {
- M5.begin(true, false, true);
- Serial.begin(115200);
- // Start up the library
- // Create the BLE Device
- BLEDevice::init("M5StackAtom");
- // Create the BLE Server
- pServer = BLEDevice::createServer();
- pServer->setCallbacks(new MyServerCallbacks());
- // Create the BLE Service
- BLEService *pService = pServer->createService(SERVICE_UUID);
- // Create a BLE Characteristic
- pCharacteristic = pService->createCharacteristic(
- CHARACTERISTIC_UUID,
- BLECharacteristic::PROPERTY_READ |
- BLECharacteristic::PROPERTY_WRITE |
- BLECharacteristic::PROPERTY_NOTIFY |
- BLECharacteristic::PROPERTY_INDICATE
- );
- // https://www.bluetooth.com/specifications/gatt/viewer?attributeXmlFile=org.bluetooth.descriptor.gatt.client_characteristic_configuration.xml
- // Create a BLE Descriptor
- pCharacteristic->addDescriptor(new BLE2902());
- // Start the service
- pService->start();
- // Start advertising
- BLEAdvertising *pAdvertising = BLEDevice::getAdvertising();
- pAdvertising->addServiceUUID(SERVICE_UUID);
- pAdvertising->setScanResponse(false);
- pAdvertising->setMinPreferred(0x0); // set value to 0x00 to not advertise this parameter
- BLEDevice::startAdvertising();
- Serial.println("initializing the scale");
- delay(10);
- scale.begin(LOADCELL_DOUT_PIN, LOADCELL_SCK_PIN);
- scale.set_scale(-2070.98238269795); //(raw_100-raw_0)/100
- // this value is obtained by calibrating the scale with known weights; see the README for details
- scale.tare();
- Serial.println("Waiting a client connection to notify...");
-
- }
- void loop() {
- if (M5.Btn.wasPressed())
- {
- Serial.println("button is pressed,scale.tare()");
- scale.tare(); // reset the scale to 0
- }
-
- // notify changed value
- if (deviceConnected)
- {
- v_scale = scale.get_units(20);
- char txString[8]; // make sure this is big enuffz
- dtostrf(v_scale, 1, 2, txString); // float to char ,for send
- pCharacteristic->setValue(txString);
- //m5atom led blink
- setBuff(0x00, 0x40, 0x00);//green,绿色led
- M5.dis.displaybuff(DisBuff);
- delay(10);
- setBuff(0x00, 0x00, 0x00); //black ,熄灭
- M5.dis.displaybuff(DisBuff);
- pCharacteristic->notify();
- Serial.print("Value of scale = ");
- Serial.println(txString);
- }
-
- delay(90); // bluetooth stack will go into congestion, if too many packets are sent, in 6 hours test i was able to go as low as 3ms
-
- // disconnecting
- if (!deviceConnected && oldDeviceConnected) {
- delay(500); // give the bluetooth stack the chance to get things ready
- pServer->startAdvertising(); // restart advertising
- Serial.println("start advertising");
- oldDeviceConnected = deviceConnected;
- }
- // connecting
- if (deviceConnected && !oldDeviceConnected) {
- // do stuff here on connecting
- oldDeviceConnected = deviceConnected;
- }
-
- delay(50);
- M5.update();
- }
2、V5电子秤 M5StackC侧代码(由Uiflow生成)
- from m5stack import *
- from m5ui import *
- from uiflow import *
- from IoTcloud import blynk
- import time
- import wifiCfg
- import unit
- setScreenColor(0x111111)
- weigh2 = unit.get(unit.WEIGHT, unit.PORTA)
- scale_pin = None
- scale = None
- butn_state = None
- butn = None
- Px = None
- wifiCfg.doConnect('your ssid', 'your pass')
- label0 = M5TextBox(47, 9, "HX711 LcdV=", lcd.FONT_Default, 0xFFFFFF, rotate=90)
- label1 = M5TextBox(47, 123, "0.0", lcd.FONT_Default, 0xFFFFFF, rotate=90)
- def blynk_read_v1(v_pin):
- global scale_pin, scale, butn_state, butn, Px
- scale_pin = v_pin
- scale = "%.1f"%(((weigh2.weight) / Px))
- blynk1.virtual_write(scale_pin, scale)
- pass
- def blynk_write_v2(v_pin, value):
- global scale_pin, scale, butn_state, butn, Px
- butn_state = v_pin
- butn = value
- if butn[0] == '1':
- weigh2.zero()
- pass
- def buttonA_wasPressed():
- global scale_pin, scale, butn_state, butn, Px
- wait(0.1)
- weigh2.zero()
- pass
- btnA.wasPressed(buttonA_wasPressed)
- if wifiCfg.wlan_sta.isconnected():
- label0.setColor(0x33ff33)
- blynk1 = blynk.Blynk(server='blynk.mixly.org', port=8080, token='your token', heartbeat=1)
- blynk1.handle_event('read v1', blynk_read_v1)
- blynk1.handle_event('write v2', blynk_write_v2)
- else:
- label0.setColor(0xffffff)
- scale = ''
- axp.setLDO2Volt(2.7)
- #Px = -8.24
- Px=-7.8 #self hx711
- while True:
- label1.setText(str("%.1f"%((axp.getBatVoltage()))))
- #label3.setText(str("%.1f"%(((weigh2.weight) / Px))))
- #label2.setText('g')
- wait(0.1)
- blynk1.run()
- wait_ms(2)
【两版电子秤的对比小结】 | 电子秤版本 | | | | | | | V4 | App inventor 2.0是非常优秀的便于上手的app制作工具,将手机Ble与esp32的ble连接后,便产生了丰富的拓展可能性。 | | | | | | V5 | Blynk是多年沉淀的物联网应用开源系统,难得可贵的是这个系统的坚守、开源和包容。esp32可以通过Ble、wifi、usb以及以太网等多种方式与其接入,从而产生丰富的创意 | | | | |
上述两个版本都属于比较容易上手的入门级小软件,又是实用的厨房秤,希望大家玩得开心。 感谢arduino.cn提供交流平台,感谢M5Stack生产优秀的极客玩具(同时也为工业物联网提供了丰富的扩展空间)
感谢M5论坛各位师兄指导,感谢裘炯涛师兄提供blynk.mixly.org服务器。
沧海抱拳。
v4/v5版的代码以及ai2文件打包附上,与各位分享。
 v4v5code.zip
(234.66 KB, 下载次数: 7)
|