|
|
本帖最后由 Mr.fan 于 2017-4-14 13:52 编辑
首先说一下项目预期的目标,通过板载的WiFi模块联网获取天气信息,使用屏幕将信息显示出来,配合板载的语音模块播放当天天气状况。
总体的设计思路:天气获取的网站是心知天气网免费的API(需要注册),400次/小时的请求足够日常使用了,当然也可以使用付费接口那样能获取更多的信息。当开发板通过API接口发送请求时网站会返回json格式的信息,然后再通过json库将有用的信息解析出来,就能得到当天的天气信息了。然后将获取到的数据发送给屏幕进行处理,根据数据控制语音模块播放相应的语音文件。
下面简单的介绍一下心知天气的API
这个链接是获取实时天气状况
https://api.seniverse.com/v3/weather/now.json?key=APIPASSWORD&location=地址&language=返回的数据语言格式&unit=温度单位
黑色加粗的部分是需要根据自己情况进行修改的。
当发送正确的请求后将会收到服务器返回的json数据
{"results":[{"location":{"id":"WX4FBXXFKE4F","name":"北京","country":"CN","path":"北京,北京,中国","timezone":"Asia/Shanghai","timezone_offset":"+08:00"},"now":{"text":"多云","code":"4","temperature":"25"},"last_update":"2017-04-14T12:20:00+08:00"}]}
黑色加粗就是我们需要解析的天气信息,本次需要用到的就这些了。更加详细的介绍请看心知天气-天气数据API
这次我们用到的库有ArduinoJson、ArduinoHttpClient、WiFi
首先我们需要在setup中连接上WiFi
[mw_shl_code=bash,true] Serial.begin(9600);
Serial.print("connect....");
while (WiFi.begin(ssid, pass) != WL_CONNECTED)
Serial.println("connected");[/mw_shl_code]
WiFi连接后发送API请求,并解析数据
[mw_shl_code=bash,true]int httpCode = 0;
String httpData;
//发送http请求
httpCode = http.get("/v3/weather/now.json?key=" + APIPASSWORD + "&location=zhengzhou&language=en&unit=c");
//若是有返回就接收数据
if ( httpCode == 0)
{
Serial.println("startedRequest ok");
httpCode = http.responseStatusCode();
if (httpCode >= 0)
{
int bodyLen = http.contentLength();
//将接收到的字符存入string中,直到数据接收完毕
while ( (http.connected() || http.available()) && (!http.endOfBodyReached()))
{
if (http.available())
{
char c = http.read();
httpData += c;
}
else
delay(1000);
}
//提取出关于天气的那一段字符串
data = httpData.substring((httpData.indexOf("\"now\":") + 6), httpData.indexOf(",\"last"));
//通过json库解析出相应的数据
DynamicJsonBuffer jsonBuffer;
JsonObject& root = jsonBuffer.parseObject(data);
temperature = root[String("temperature")];
code = root[String("code")];
}
}
else
Serial.print("Connect failed");
http.stop();
//串口打印出温度
Serial.print("temperature is :"):
Serial.println(temperature);
Serial.print("end");[/mw_shl_code]
关于json库的使用我了解的不是很多,没法做详细的说明。我在做的时候发现若是将整个返回的数据进行解析并得不到正确的信息,我猜测是因为返回的数据包含有其他的信息并不是json库所能解析的格式,因此我将接收到的字符存入到一个String类型的字符串中,然后截取其中一段(也就是上面黑色加粗的那一段)进行解析。需要注意的是json解析String类型的方式和char类型是不同的,具体还请参考ArduinoJson的示例。
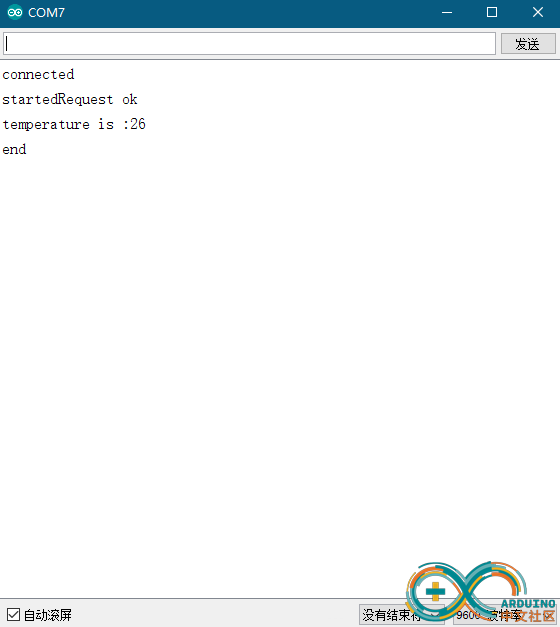
最后的结果

就简单的介绍到这了,下一篇将介绍如何处理数据并发送给屏幕。
最后提醒一下最好在loop中加入一个延时,要不然会一直发送请求,次数很快就会用完的
还有就是要感谢一下Fireduino团队提供的开发板,做工真的很精美,第一次使用这么好的板子啊。
附上完整的代码
[mw_shl_code=bash,true]#include <ArduinoJson.h>
#include <SPI.h>
#include <WiFi.h>
#include <ArduinoHttpClient.h>
const char ssid[] = "your wifi ssid";
const char pass[] = "your wifi password";
const String APIPASSWORD = "your api password";
String web_address = "api.seniverse.com";
int temperature,code;
String data;
WiFiClient wifi;
HttpClient http(wifi, web_address);
void setup()
{
Serial.begin(9600);
Serial.print("connect....");
while (WiFi.begin(ssid, pass) != WL_CONNECTED)
Serial.println("connected");
}
void loop()
{
int httpCode = 0;
String httpData;
//发送http请求
httpCode = http.get("/v3/weather/now.json?key=" + APIPASSWORD + "&location=zhengzhou&language=en&unit=c");
//若是有返回就接收数据
if ( httpCode == 0)
{
Serial.println("startedRequest ok");
httpCode = http.responseStatusCode();
if (httpCode >= 0)
{
int bodyLen = http.contentLength();
//将接收到的字符存入string中,直到数据接收完毕
while ( (http.connected() || http.available()) && (!http.endOfBodyReached()))
{
if (http.available())
{
char c = http.read();
httpData += c;
}
else
delay(1000);
}
//提取出关于天气的那一段字符串
data = httpData.substring((httpData.indexOf("\"now\":") + 6), httpData.indexOf(",\"last"));
//通过json库解析出相应的数据
DynamicJsonBuffer jsonBuffer;
JsonObject& root = jsonBuffer.parseObject(data);
temperature = root[String("temperature")];
code = root[String("code")];
}
}
else
Serial.print("Connect failed");
http.stop();
//串口打印出温度
Serial.print("temperature is :");
Serial.println(temperature);
Serial.print("end");
while (1);
}[/mw_shl_code]
|
|