|
|
本帖最后由 topdog 于 2022-9-2 22:25 编辑
深圳晶彩智能2.8寸彩色屏,分辨率为340x280,采用ILI9341_2驱动,板载乐鑫公司出品ESP-WROOM-32,外接Flash 8M。
1,自定义核心
PlatformIO IDE允许自定义核心的,Windows 10系统依C:\Users\用户名\.platformio\platforms\espressif32\boards路径,用记事本或者nodepad++把以下文字保存为JCZN_WROOM_32.json ,这样在Boards中就能找到自定义名称板子了,设置核心为ESP-WROOM-32 ,外接闪存设置成了8M,也能使用board_build.partitions = default_8MB.csv管理闪存了。
[pre]{
"build": {
"arduino":{
"ldscript": "esp32_out.ld"
},
"core": "esp32",
"extra_flags": "-DARDUINO_ESP32_DEV",
"f_cpu": "240000000L",
"f_flash": "40000000L",
"flash_mode": "qio",
"mcu": "esp32",
"variant": "esp32"
},
"connectivity": [
"wifi",
"bluetooth",
"ethernet",
"can"
],
"debug": {
"openocd_board": "esp-wroom-32.cfg"
},
"frameworks": [
"arduino",
"espidf"
],
"name": "JCZN WROOM 32",
"upload": {
"flash_size": "8MB",
"maximum_ram_size":327680,
"maximum_size": 8388608,
"require_upload_port": true,
"speed":460800
},
"url": "http://www.jczn1688.com/sy",
"vendor": "JCZN"
}[/pre]
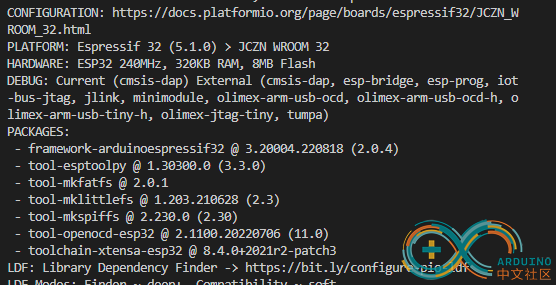
烧录界面可以看到8M Flash被确认了!

2,播放SD卡图片
介绍的此示例非常适合做个人的照片播放器,或者桌面宣传栏。SD卡使用之前需要FAT32格式化一下,把附件中的4张图片解压以后,放置于根目录之下。
(1),pio home 创建项目SD_JPG_JCZN
(2),pio home 安装 TFT_eSPI库
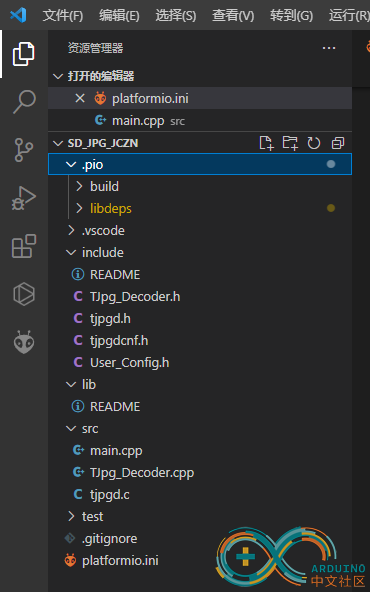
(3),pio home 安装TJpg_Decoder 库编译时没有通过。只能手动安装,于此地址 https://github.com/Bodmer/TJpg_Decoder ,下载1.0.5版本。然后把src中的*.h文件全部放到\PlatformIO\Projects\SD_JPG_JCZN\include文件夹里面,*.cpp和*.c文件放到\PlatformIO\Projects\SD_JPG_JCZN\src文件夹。
示例项目文件结构如下:

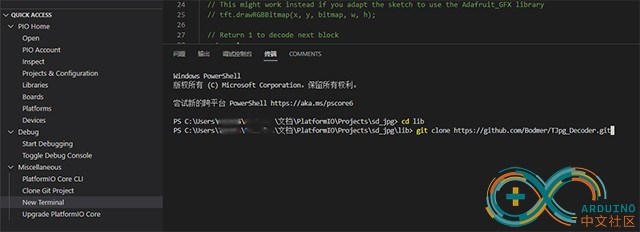
另外还可以New Terminal输入以下命令,把TJpg_Decoder 库装到lib文件夹下面:
[pre]cd lib
git clone https://github.com/Bodmer/TJpg_Decoder.git[/pre]
操作图如下:

(4)深圳晶彩智能2.8寸彩色屏(第一版),这里没用用到触碰功能所以没有设置,对应的platformio.ini 做如下修改:
[pre][env:JCZN_WROOM_32]
platform = espressif32
board = JCZN_WROOM_32
framework = arduino
board_build.flash_mode = qio
monitor_speed = 115200
upload_port = COM9
monitor_filters = esp32_exception_decoder , default
; change microcontroller
board_build.mcu = esp32
upload_protocol = esptool
; change MCU frequency
board_build.f_cpu = 240000000L
lib_ldf_mode = deep+
board_build.partitions = default_8MB.csv
platform_packages =
platformio/framework-arduinoespressif32@^3.20004.0
build_flags = -DCORE_DEBUG_LEVEL=3
-DBOARD_HAS_PSRAM
-mfix-esp32-psram-cache-issue
-DUSER_SETUP_LOADED=1
-DDEBUG=1
-DILI9341_2_DRIVER=1
-DTFT_RGB_ORDER=TFT_BGR
-DTFT_WIDTH=240
-DTFT_HEIGHT=320
-DTFT_BACKLIGHT_ON=HIGH
-DTFT_BACKLIGHT_OFF=LOW
-DTFT_MISO=12
-DTFT_MOSI=13
-DTFT_SCLK=14
-DTFT_CS=15
-DTFT_DC=2
-DTFT_RST=-1
-DTFT_BL=21
-DSD_CS=5
-DLOAD_GLCD=1
-DLOAD_FONT2=1
-DLOAD_FONT4=1
-DLOAD_FONT6=1
-DLOAD_FONT7=1
-DLOAD_FONT8=1
-DLOAD_GFXFF=1
-DSMOOTH_FONT=1
-DSPI_FREQUENCY=55000000
-DSPI_READ_FREQUENCY=20000000
-DSPI_TOUCH_FREQUENCY=2500000
-DUSE_HSPI_PORT=1
lib_deps = bodmer/TFT_eSPI@^2.4.75[/pre]
(5)程序主体main.cpp如下:
[pre]#include <Arduino.h>
#include <TJpg_Decoder.h>
#include "SPIFFS.h" // ESP32 only
// Include the TFT library https://github.com/Bodmer/TFT_eSPI
#include "SPI.h"
#include <TFT_eSPI.h> // Hardware-specific library
TFT_eSPI tft = TFT_eSPI(); // Invoke custom library
String jpeg[4] = {"/panda.jpg", "/Baboon40.jpg", "/EagleEye.jpg", "/lena20k.jpg"};
bool tft_output(int16_t x, int16_t y, uint16_t w, uint16_t h, uint16_t *bitmap)
{
// Stop further decoding as image is running off bottom of screen
if (y >= tft.height())
return 0;
// This function will clip the image block rendering automatically at the TFT boundaries
tft.pushImage(x, y, w, h, bitmap);
// This might work instead if you adapt the sketch to use the Adafruit_GFX library
// tft.drawRGBBitmap(x, y, bitmap, w, h);
// Return 1 to decode next block
return 1;
}
void setup()
{
Serial.begin(115200);
Serial.println("\n\n Testing TJpg_Decoder library");
// Initialise SD before TFT
if (!SD.begin(SD_CS))
{
Serial.println(F("SD.begin failed!"));
while (1)
delay(0);
}
Serial.println("\r\nInitialisation done.");
// Initialise the TFT
tft.begin();
tft.setTextColor(0xFFFF, 0x0000);
tft.fillScreen(TFT_BLACK);
tft.setSwapBytes(true); // We need to swap the colour bytes (endianess)
// The jpeg image can be scaled by a factor of 1, 2, 4, or 8
TJpgDec.setJpgScale(1);
// The decoder must be given the exact name of the rendering function above
TJpgDec.setCallback(tft_output);
}
void loop()
{
for (int i = 0; i < 4; i++)
{
tft.fillScreen(TFT_RED);
delay(2000);
// Get the width and height in pixels of the jpeg if you wish
uint16_t w = 0, h = 0;
TJpgDec.getSdJpgSize(&w, &h, jpeg);
Serial.print("Width = ");
Serial.print(w);
Serial.print(", height = ");
Serial.println(h);
// Draw the image, top left at 0,0
TJpgDec.drawSdJpg(0, 0, jpeg);
// Wait before drawing again
delay(2000);
}
}[/pre]
(6)有图有真相,编译烧录速度24.56秒,非常迅捷吧!

(7)示例SD卡中放置的照片
 JPG.rar
(79.95 KB, 下载次数: 0)
|
|