|
|
本帖最后由 oldcat0517 于 2021-3-29 14:22 编辑
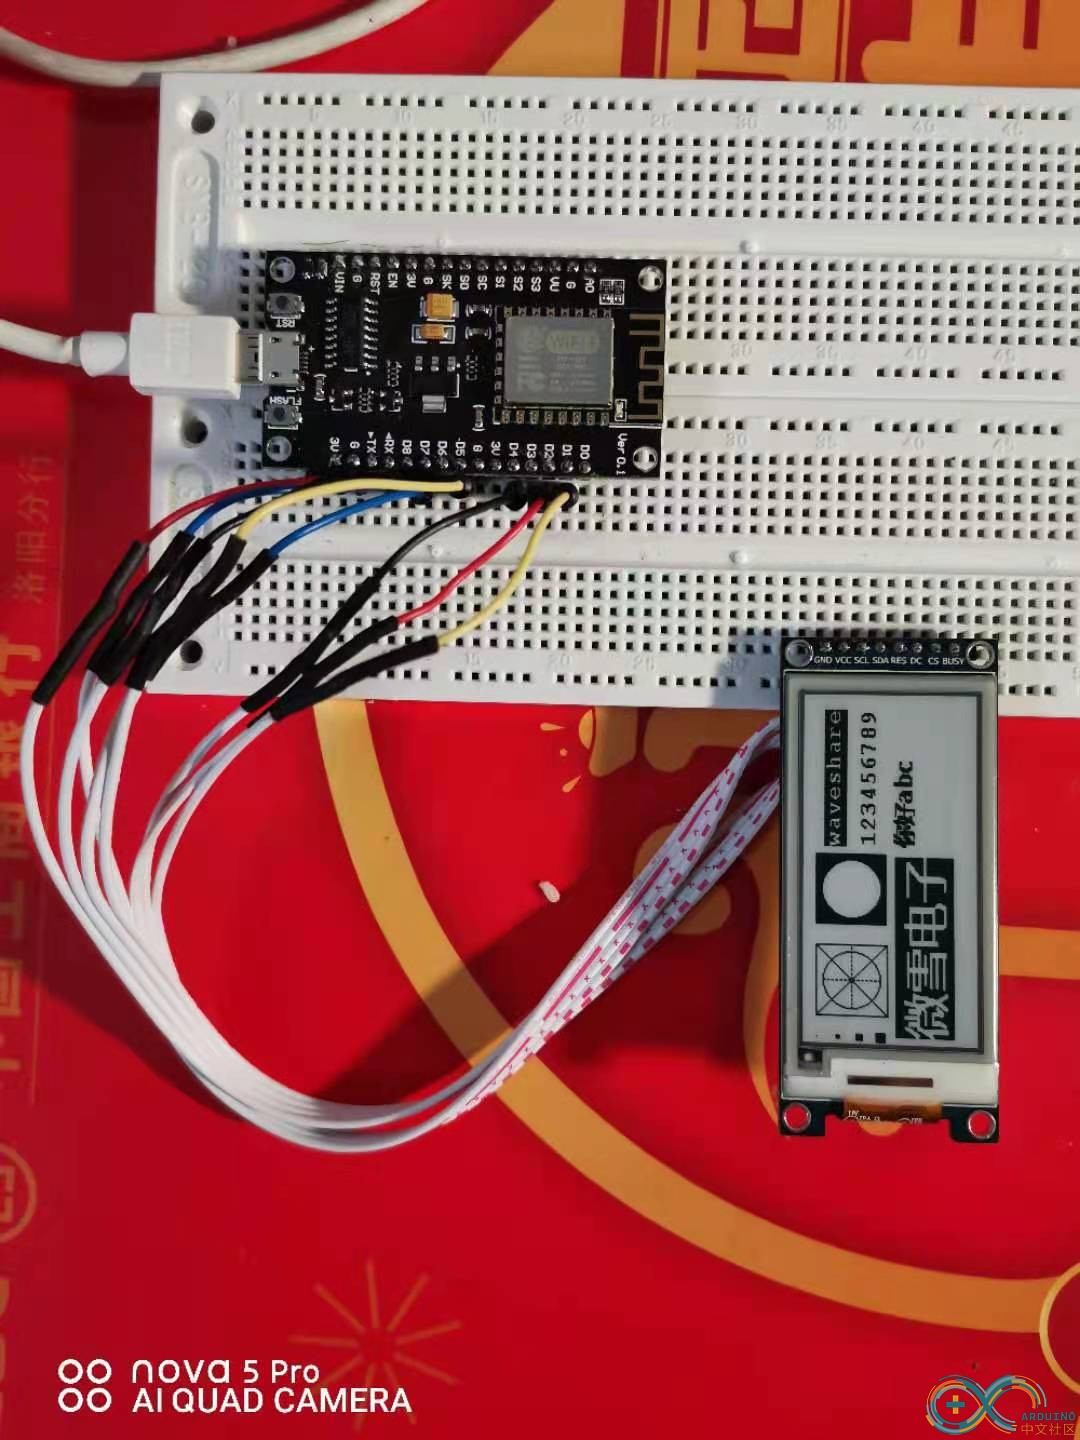
使用ESP8266驱动微雪e-paer墨水屏
前些时候使用Arduino nona小板子,成功驱动了微雪e-paer2.13墨水屏,但由于Arduino nona小板子内存小、主频低,虽然可以显示,但显示的内容受到限制,心感不爽,一直想把它移植到,STM32或ESP8266这样的32位新片上,现手上有STM32F103C8T6、ESP8266这种低档小板子,没办法,毕竟咱不是专用的,只能有什么用什么了,开干。
1、选择:STM32、ESP8266中选后者吧,有4M闪存,可以放图形或字库。
2、接线:接线是比较麻烦的,初学者往往都是从看别人程序开始的,如果程序不是自己写的(甚至看程序也是半懂不懂),就不知道管脚定义,无法连接,网上那些大咖往往不顾及初学小弟的苦,不屑写明,我这里给小弟。
功能引脚 ESP8266 描述
VCC VCC 电源正(3.3V电源输入)
GND GND 电源地
SCK 14 SPI的CLK, 时钟信号输入
DIN 13 SPI的MOSI, 数据输入
CS 15 片选,低电平有效
BUSY 5 忙状态输出引脚(表示忙碌)
RST 2 复位,低电平有效
DC 4 数据/命令,低表示命令高表示数据
还看不懂下面有实物照片,查线头吧。
3、下程序:程序就不写了,下微雪示例,很标准,编译无错误。
4、学习改造:程序能跑起来后,自己琢磨,改成什么自己看着办吧。
[esp8266-e-paer2.13]
[esp8266-e-paer2.13]
kan/* Includes ------------------------------------------------------------------/
#include “DEV_Config.h”
#include “EPD.h”
#include “GUI_Paint.h”
#include “imagedata.h”
#include <stdlib.h>
/ Entry point ----------------------------------------------------------------*/
void setup(){
printf(“EPD_2IN13_test Demo\r\n”);
DEV_Module_Init();
printf(“e-Paper Init and Clear…\r\n”);
EPD_2IN13_Init(EPD_2IN13_FULL);
EPD_2IN13_Clear();
DEV_Delay_ms(500);
//Create a new image cache
UBYTE BlackImage;
/ you have to edit the startup_stm32fxxx.s file and set a big enough heap size */
UWORD Imagesize = ((EPD_2IN13_WIDTH % 8 == 0) ? (EPD_2IN13_WIDTH / 8 ) : (EPD_2IN13_WIDTH / 8 + 1)) * EPD_2IN13_HEIGHT;
if ((BlackImage = (UBYTE *)malloc(Imagesize)) == NULL) {
printf(“Failed to apply for black memory…\r\n”);
while (1);
}
printf(“Paint_NewImage\r\n”);
Paint_NewImage(BlackImage, EPD_2IN13_WIDTH, EPD_2IN13_HEIGHT, 270, WHITE);
#if 1 //show image for array
printf(“show image for array\r\n”);
Paint_SelectImage(BlackImage);
Paint_Clear(WHITE);
Paint_DrawBitMap(gImage_2in13);
EPD_2IN13_Display(BlackImage);
DEV_Delay_ms(2000);
#endif
#if 1 // Drawing on the image
printf(“Drawing\r\n”);
//1.Select Image
Paint_SelectImage(BlackImage);
Paint_Clear(WHITE);
// 2.Drawing on the image
Paint_DrawPoint(5, 10, BLACK, DOT_PIXEL_1X1, DOT_STYLE_DFT);
Paint_DrawPoint(5, 25, BLACK, DOT_PIXEL_2X2, DOT_STYLE_DFT);
Paint_DrawPoint(5, 40, BLACK, DOT_PIXEL_3X3, DOT_STYLE_DFT);
Paint_DrawPoint(5, 55, BLACK, DOT_PIXEL_4X4, DOT_STYLE_DFT);
Paint_DrawLine(20, 10, 70, 60, BLACK, DOT_PIXEL_1X1, LINE_STYLE_SOLID);
Paint_DrawLine(70, 10, 20, 60, BLACK, DOT_PIXEL_1X1, LINE_STYLE_SOLID);
Paint_DrawRectangle(20, 10, 70, 60, BLACK, DOT_PIXEL_1X1, DRAW_FILL_EMPTY);
Paint_DrawRectangle(85, 10, 135, 60, BLACK, DOT_PIXEL_1X1, DRAW_FILL_FULL);
Paint_DrawLine(45, 15, 45, 55, BLACK, DOT_PIXEL_1X1, LINE_STYLE_DOTTED);
Paint_DrawLine(25, 35, 70, 35, BLACK, DOT_PIXEL_1X1, LINE_STYLE_DOTTED);
Paint_DrawCircle(45, 35, 20, BLACK, DOT_PIXEL_1X1, DRAW_FILL_EMPTY);
Paint_DrawCircle(110, 35, 20, WHITE, DOT_PIXEL_1X1, DRAW_FILL_FULL);
Paint_DrawString_EN(140, 15, “waveshare”, &Font16, BLACK, WHITE);
Paint_DrawNum(140, 40, 123456789, &Font16, BLACK, WHITE);
Paint_DrawString_CN(140, 60, “你好abc”, &Font12CN, BLACK, WHITE);
Paint_DrawString_CN(5, 65, “微雪电子”, &Font24CN, WHITE, BLACK);
EPD_2IN13_Display(BlackImage);
DEV_Delay_ms(2000);
#endif
#if 1 //Partial refresh, example shows time
printf(“Partial refresh\r\n”);
EPD_2IN13_Init(EPD_2IN13_PART);
Paint_SelectImage(BlackImage);
PAINT_TIME sPaint_time;
sPaint_time.Hour = 12;
sPaint_time.Min = 34;
sPaint_time.Sec = 56;
UBYTE num = 20;
for (; |
-

|