|
|
好多例程都是耍流氓,各种bug,本例无
支持原创,乐于分享!
/*
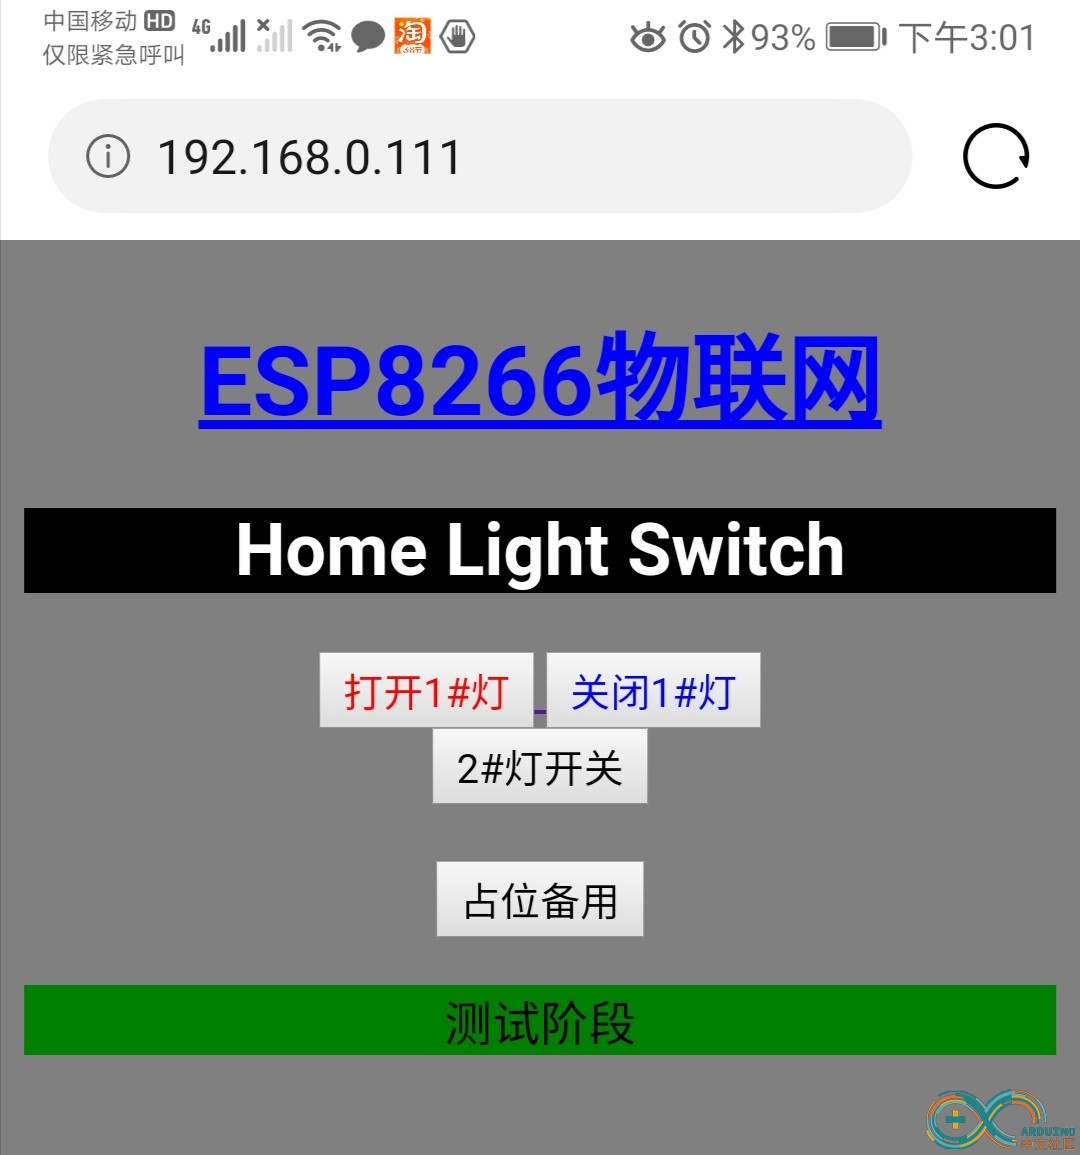
* 假设您的ESP8266开发板IP地址是192.168.0.111,那么接下来您可以通过浏览器输入该IP地址
* 当ESP8266开发板建立网络服务器以后,每当有客户端APP向服务器发送HTTP请求时,我们可以利用on函数来设置HTTP请求回调函数
* 对于IE浏览器,同时按下alt+热键后,松开,再按enter才能激活on/off,热键定义在文件index.h中
* In avr-libc-1.8.0, the function memcpy_P() is defined in avr-libc-1.8.0/libc/pmstring/memcpy_P.S
* ingroup avr_pgmspace
* fn void *memcpy_P(void *dest, PGM_VOID_P src, size_t n)
* The memcpy_P() function is similar to memcpy(), except the src string resides in program space.
* The memcpy_P() function returns a pointer to dest.
*
*/
#include <ESP8266WiFi.h>
#include <WiFiClient.h>
#include <ESP8266WebServer.h>
#include <ESP8266mDNS.h>
#include "index.h"
#ifndef STASSID //Service Set Identifier 服务集标识
#define STASSID "TP-LINK_2F98"
#define STAPSK "1122334455"
#endif
const char* ssid = STASSID;
const char* password = STAPSK;
ESP8266WebServer espServer(80); //定义网页服务器对象及端口,网络服务器标准http端口号为80
const int led1 = 13;
const int led2 = 14;
//const int led = 2;
void handleRoot() { //处理网站根目录"/"的访问请求,返回PAGE_INDEX页面
//digitalWrite(led, 1);
//server.send(200, "text/plain", "hello from esp8266!");
//espServer.send(200, "text/html", "<form action=\"/LED\" method=\"POST\"><input type=\"submit\" value=\"Toggle LED\"></form>"); // NodeMCU将调用此函数。访问成功返回200状态码,返回信息类型text/html
espServer.send(200,"text/html",PAGE_INDEX); // 文本格式为html,PAGE_INDEX的定义在“index.h”头文件中
//delay(1000);
//digitalWrite(led, 0);
}
void handleNotFound() {
digitalWrite(LED_BUILTIN, 1);
String message = "File Not Found\n\n";
message += "URI: ";
message += espServer.uri();
message += "\nMethod: ";
message += (espServer.method() == HTTP_GET) ? "GET" : "POST";
message += "\nArguments: ";
message += espServer.args();
message += "\n";
for (uint8_t i = 0; i < espServer.args(); i++) {
message += " " + espServer.argName(i) + ": " + espServer.arg(i) + "\n";
}
espServer.send(404, "text/plain", message);
digitalWrite(LED_BUILTIN, 0);
}
void handleLED(){
digitalWrite (LED_BUILTIN,!digitalRead(LED_BUILTIN));// 改变LED的点亮或者熄灭状态
digitalWrite (led2,!digitalRead(led2));
espServer.sendHeader("Location","/"); //Location 跳转回页面根目录
espServer.send(303); // 发送Http相应代码303 跳转
//espServer.send(200, "text/plain", "this works as well");
}
void setup(void) {
pinMode (led1, OUTPUT);
pinMode (led2, OUTPUT);
pinMode (LED_BUILTIN,OUTPUT);
digitalWrite(led2, 0);
digitalWrite(LED_BUILTIN, 1);
Serial.begin(115200);
Serial.setDebugOutput(true);
WiFi.begin(ssid, password);
WiFi.mode(WIFI_STA);
Serial.println("");
// Wait for connection
while (WiFi.status() != WL_CONNECTED) {
delay(500);
Serial.print(".");
}
Serial.println("");
Serial.print("Connected to ");
Serial.println(ssid);
Serial.print("IP address: ");
Serial.println(WiFi.localIP());
//MDNS.begin ("esp8266");
if (MDNS.begin("esp8266")) {
Serial.println("MDNS responder started");
}
espServer.on ("/",HTTP_GET,handleRoot); //访问网站的根目录,处理GET请求,执行handleRoot函数
espServer.on ("/LED",HTTP_POST,handleLED); //设置处理LED控制请求函数,处理POST请求
espServer.on ("/", handleRoot); //处理首页链接请求的事件,例如192.168.0.111/index.html
espServer.on ("/index.html",handleRoot); //效果同上
//测试页
espServer.on ("/inline", []() { //引入Lambda表达式编写内嵌的匿名函数
espServer.send(200, "text/plain", "this works is well");
});
// 定义控制功能
espServer.on ("/switch", []() {
if (espServer.hasArg("led")){ //请求中是否包含有led的参数
String state=espServer.arg("led"); //获得led参数的值<a href="/switch?led=on">
if (state=="on"){
digitalWrite(led1,HIGH);
//espServer.send(200,"text/html","Pin13 is on"); return;
}
else if (state=="off"){
digitalWrite(led1,LOW);
//espServer.send(200,"text/html","Pin13 is off"); return;
}
else{
state="Unkown state value";
//espServer.send(200,"text/html","unknown state"); return; //led其它(状态)值
}
espServer.send(200,"text/html","<h1> LED is <font color=\"red\"> " + state + " </font> <br> The lamp is OK! </h1> <br>" + "<h2> Enjoy! </h2>");
}
else
espServer.send(200,"text/html","state not found");
});
// 输出一个笑脸,没有意义
espServer.on ("/gif", []() {
static const uint8_t gif[] PROGMEM = {
0x47, 0x49, 0x46, 0x38, 0x37, 0x61, 0x10, 0x00, 0x10, 0x00, 0x80, 0x01,
0x00, 0x00, 0x00, 0x00, 0xff, 0xff, 0xff, 0x2c, 0x00, 0x00, 0x00, 0x00,
0x10, 0x00, 0x10, 0x00, 0x00, 0x02, 0x19, 0x8c, 0x8f, 0xa9, 0xcb, 0x9d,
0x00, 0x5f, 0x74, 0xb4, 0x56, 0xb0, 0xb0, 0xd2, 0xf2, 0x35, 0x1e, 0x4c,
0x0c, 0x24, 0x5a, 0xe6, 0x89, 0xa6, 0x4d, 0x01, 0x00, 0x3b
};
char gif_colored[sizeof(gif)];
memcpy_P(gif_colored, gif, sizeof(gif));
// Set the background to a random set of colors
gif_colored[16] = millis() % 256;
gif_colored[17] = millis() % 256;
gif_colored[18] = millis() % 256;
espServer.send(200, "image/gif", gif_colored, sizeof(gif_colored));
});
//处理找不到指定路径的事件
espServer.onNotFound(handleNotFound);
espServer.begin();
Serial.println("Awesome! HTTP esp8266_server started!");
}
void loop(void) {
espServer.handleClient(); //检查有没有客户端设备通过网络向ESP8266网络服务器发送请求
MDNS.update();
}
//通过新建标签增加index.h 文件,与主程序在同一路径下
//不能使用=====R"()"=====
//注意要使用半角符号的引号
//onclick="alert('string ');" 最后面的分号必须有-->
static const char PAGE_INDEX[] PROGMEM = u8R"(
<!DOCTYPE html>
<html>
<head>
<meta charset="utf-8">
<meta name="viewport" content="width=device-width, initial-scale=1">
<!--meta http-equiv="refresh" content="20"-->
<title>物联网控制页面</title>
<!--没有效果link rel="stylesheet" -->
<style>
html{
text-align:center;
}
</style>
</head>
<body bgcolor="grey">
<h1> <font color="blue"> <u> ESP8266物联网 </u> </font> </h1>
<h2 style="background-color:black"><font color="white"> Home Light Switch</font></h2>
<a href="/switch?led=on" accesskey="Q"> <button type="button"> <font color="red">打开1#灯</font> </button> </a>
<a href="/switch?led=off" accesskey="E"> <button type="button"> <font color="blue">关闭1#灯</font> </button> </a><br>
<form action="/LED" method="POST"><input type="submit" value="2#灯开关"></form><br>
<button type="button">占位备用</button>
<p style="background-color: green">测试阶段</p>
</body>
</html>
)";

|
|